FIDO Device Onboarding (FDO) - Intro
The FIDO Device Onboard (FDO) specification is the first widely accepted industry specification aimed at solving edge computing and Internet of Things (IoT) device onboarding challenges.
The edge device onboarding problem is not new, and companies have developed solutions to cover the challenges. However, none was accepted as a standard because they were either lock-in solutions or had other issues.
A common problem when creating device image templates as was explained in the introduction to secure edge device onboarding, is that the device manufacturer needs to know details about who the device owner or user will be (think about certificates, passwords, etc) and sometimes even the installation platform details to preconfigure the device. As you can probably imagine, that’s inconvenient and even more difficult if you rely on a third-party manufacturer to create the devices.
FDO’s origins
Because of these issues, a group of smart people decided it would be a good idea to think about what proper edge computing device onboarding should look like. Thanks to a great cross-company collaboration spirit (one of the best open source principles), they designed the FDO specification. In the collaboration’s words:
The FIDO Alliance is an open industry association with a focused mission: authentication standards to help reduce the world’s over-reliance on passwords. The FIDO Alliance promotes the development of, use of, and compliance with standards for authentication and device attestation.
Since nobody wants to reinvent the wheel, they looked for solutions that could be the foundation for the FDO implementation. Intel offered its Secure Device Onboarding (SDO) technology to the Linux Foundation, and the alliance agreed it would be a good starting point. So you could say that SDO is the parent of FDO.
Taking SDO as the foundation, the alliance developed the FDO standard with these key principles in mind:
-
The specification should solve the authentication/trust problem with standard tools.
-
The specification should be compatible with other existing zero-touch provisioning tools.
-
It cannot be tied to any specific hardware or platform.
-
It needs to implement "late binding," which means you don’t need to know the final owner or deployment details when creating the device templates. This approach reduces the number of templates and allows manufacturers to standardize their offerings.
-
The specification must be open.
As a result, we now have an industry-accepted specification for IoT and edge computing device onboarding promoted by the Linux Foundation Edge (LF-Edge) organization.
FDO components
Companies typically acquire their IoT and edge computing devices from a third party (OEM) that provides the solution. There are two main players: the manufacturer and the customer or owner, and they are usually at separate locations. The manufacturer creates the device or image template at their location. The owner, who does not need any specific technical background related to the solution, receives the device, deploys it on the selected platform, boots it up, possibly customizes provisioning with a simple wizard (planned for future FDO releases), and starts using it.
This model requires several pieces: The manufacturer must be able to sign the device, the owner must be able to trust the device, and the provisioning must be completed automatically with the customizations required by the owner, location, and device usage. These pieces include:
-
Manufacturing server: Located at the manufacturer’s premises, the Manufacturing server signs the device, creates a voucher to set the device ownership, and binds it to a specific platform or cloud.
-
Rendezvous server: This server is located at the owner’s premises or the platform where the device management system will be used (such as a public cloud). It receives the voucher generated by the Manufacturing server during the first device boot. The server then matches the device UUID with a target platform or cloud and provides information to the device about which Owner server endpoint it should use.
-
Owner or onboarding server: This is located at the owner’s premises or the platform where the device will be deployed. After device authentication, a secure channel is created between the device and this server that is used to send the required pieces (such as files and scripts) for the onboarding automation to the device.
-
Device client: Installed on the device as the client piece of the solution, it queries the servers where the onboarding automation will be executed. This client could be implemented on top of the device’s processor or co-processor firmware, a microcontroller unit, or as a process of an operating system.
Communication between these components happens using standard TCP/IP protocols such as HTTP/HTTPS.
You could also use FDO in completely disconnected environments, provided the device has access to the Rendezvous and Owner servers.
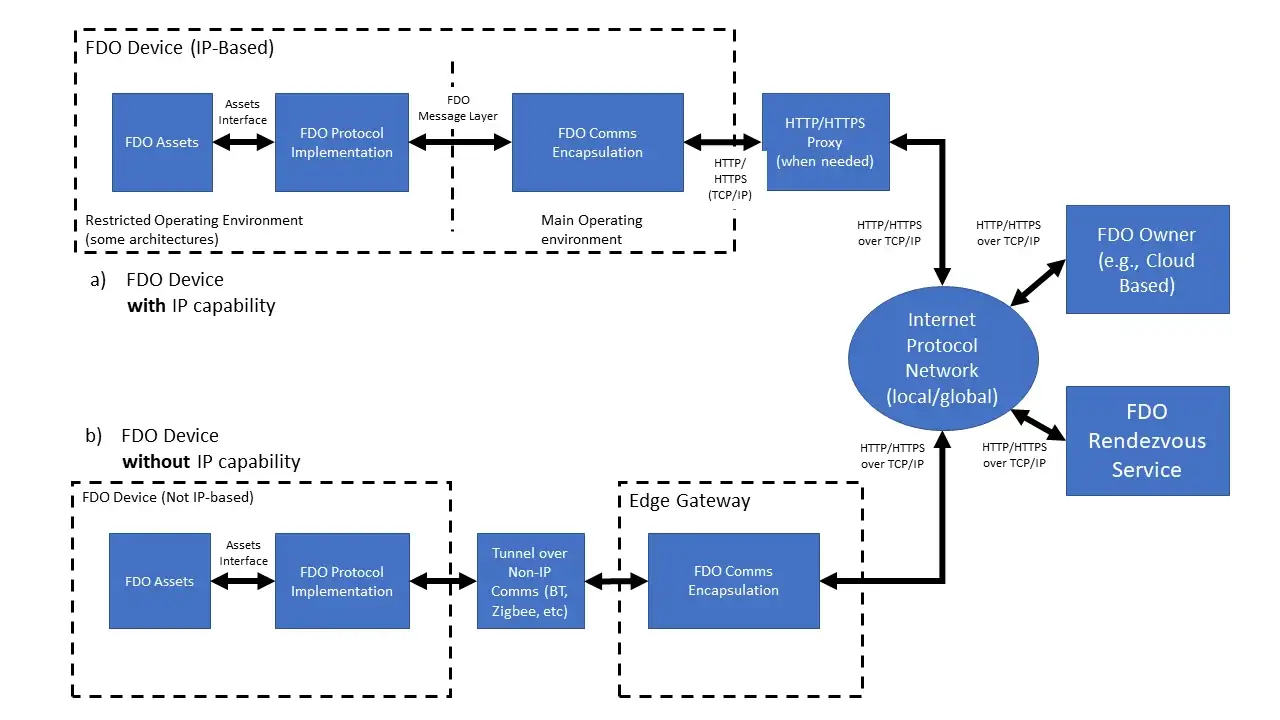
Other pieces that could be included as part of the solution are API servers that make it possible to manage the device programmatically, or proxies or edge gateways that enable non-IP systems to communicate with the servers, as depicted below.

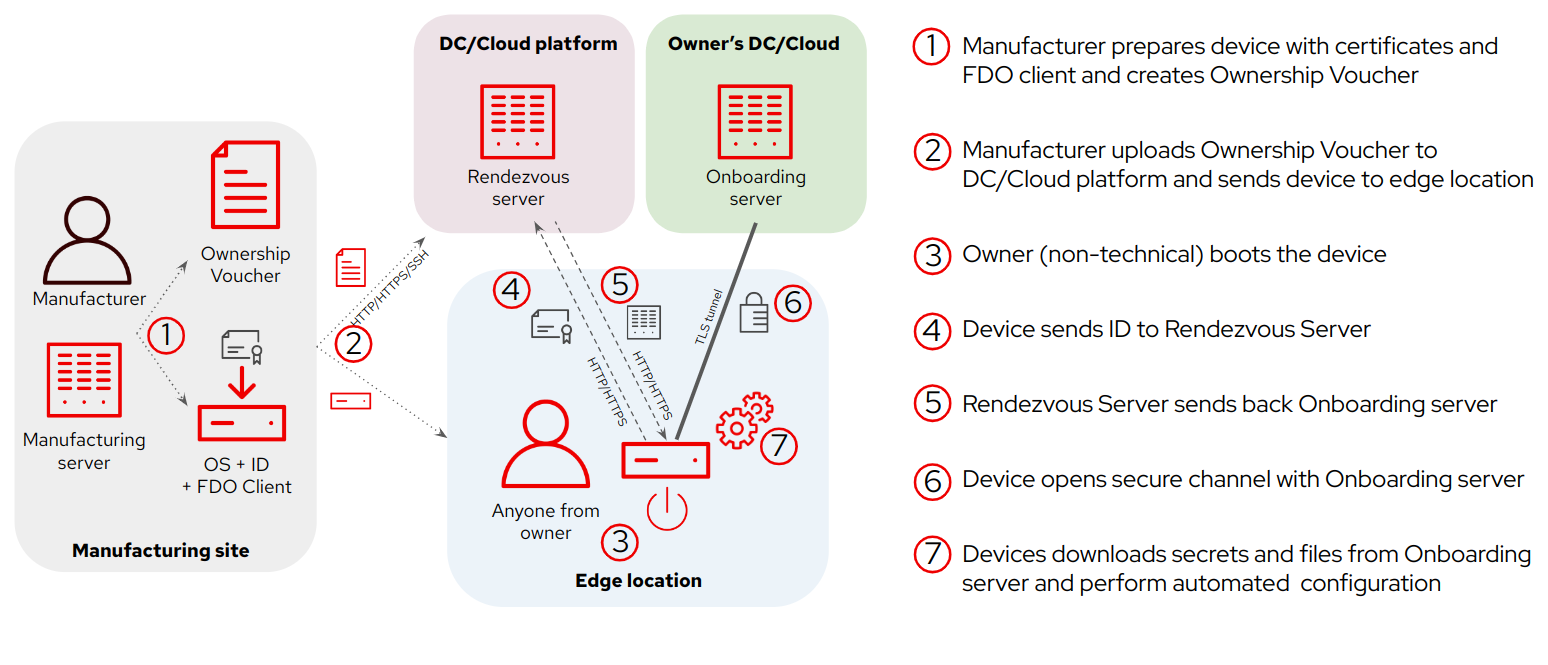
Let’s review the role of these components by reviewing the FDO workflow during device onboarding.
FDO workflow

There are three stages in the FDO specification: Before, during, and after the device’s first boot.
1. Before the first boot
This step takes place at the manufacturing location, which could be a third party or another organization inside your own company.
The device is prepared at the manufacturing location. This process involves the following steps:
-
The tools required to identify the device are included in the device. These include the FDO client and a set of certificates and keys that could be installed on the operating system or part of the firmware (such as in a Trusted Platform Module).
-
The Rendezvous server endpoint (URL) is included in the device.
-
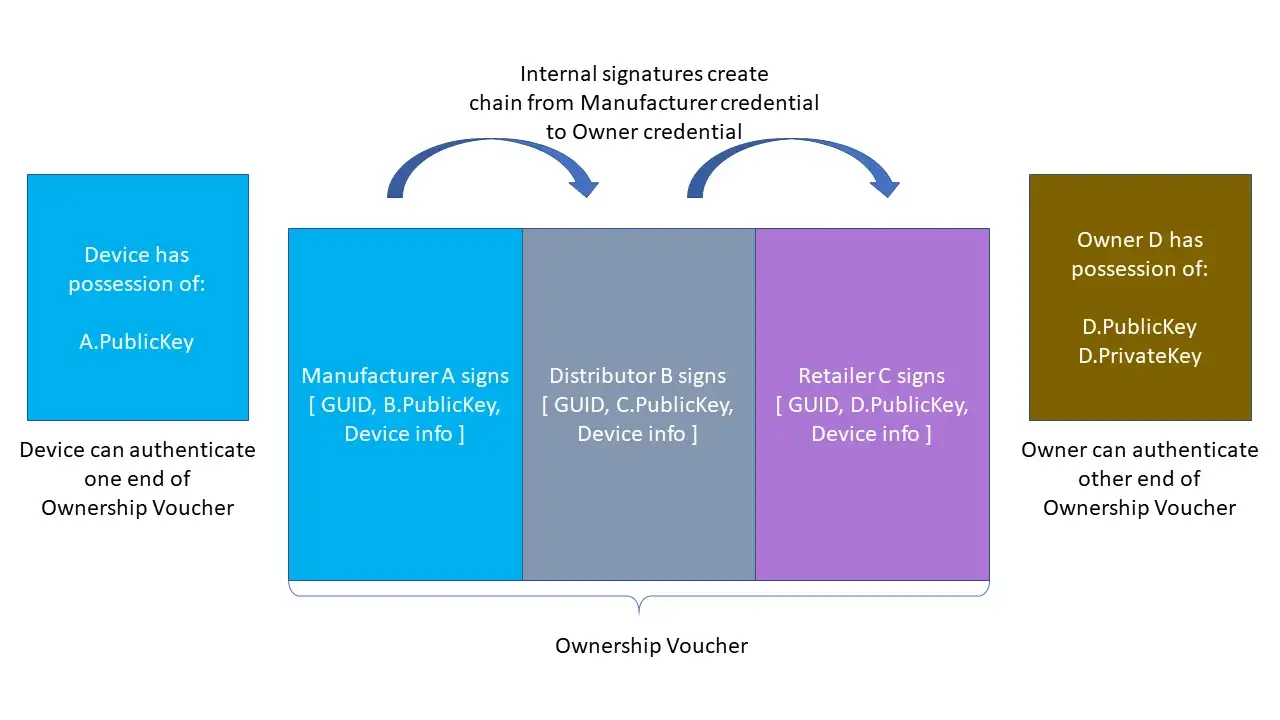
The ownership voucher is created. This piece is not included in the device; it’s maintained separately, which is convenient if you need to change the device-platform owner assignment without touching the device.
Next, the device and the ownership voucher are sent to either the owner or a partner (a value-added reseller) who includes the device as part of a solution it resells. When there are third parties between the manufacturer and the final owner, you can track the complete chain of ownership using the ownership voucher by including different certificates and keys (shown in the diagram below).

Finally, the device owner uses the ownership voucher in the target platform or cloud to register the device. That registration happens in the Rendezvous server.
2. During the first boot
Now that everything is prepared, it’s time to connect and boot the device.
-
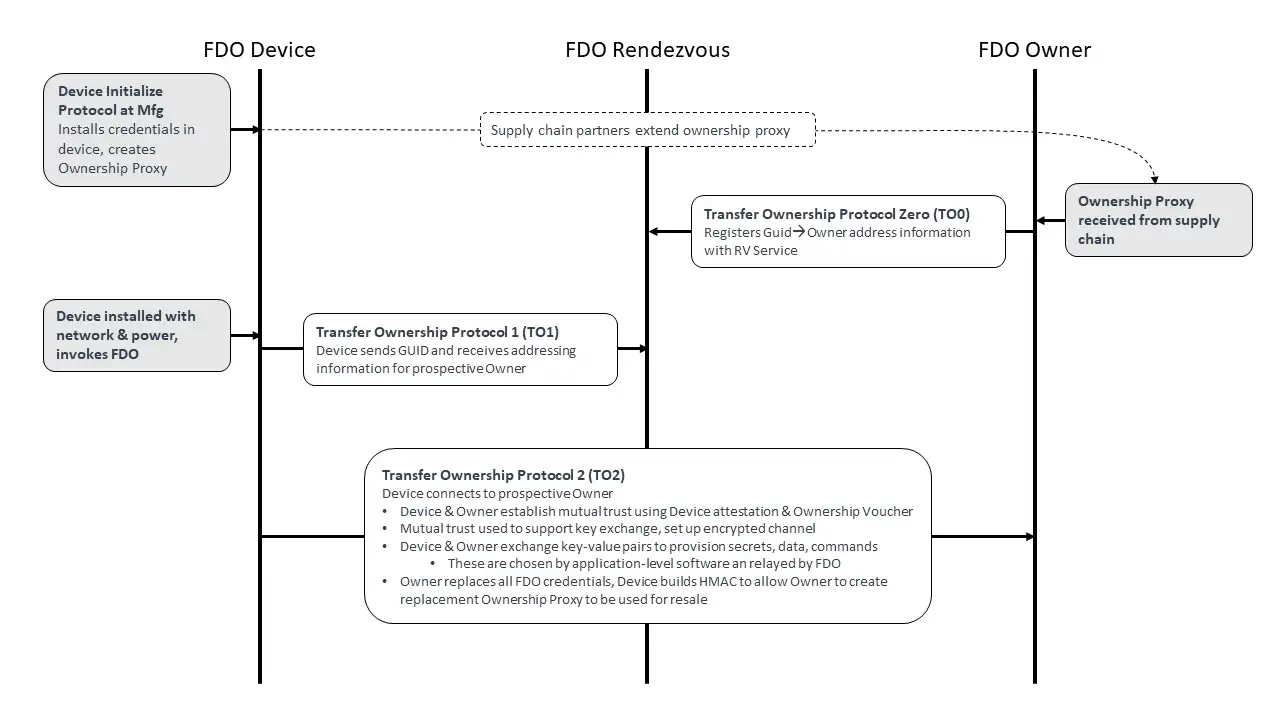
During the first boot, the device contacts the Rendezvous server endpoint(s) configured during the manufacturing phase. After the device identifies itself, the Rendezvous server sends back the platform or cloud Owner server endpoint that that device should use.
-
The device contacts the Owner server endpoint shared by the Rendezvous server and identifies itself, and the platform or cloud sends back the ownership voucher that it received before.
-
A secure tunnel is created between the device and the Owner server(s). The device uses it to download the files (including the secrets) and automation tasks it should execute during the onboarding.
This diagram shows a summary of these steps, including the communications between the Rendezvous server and the Owner server:
