Data Management
In the context of AI, data management is a critical foundational phase that determines the overall success of the model. A well-executed data management strategy directly impacts the performance, accuracy, and reliability of the AI system since the AI model learns from data
It involves three essential steps:

-
Data Collection: Gathering and inspecting raw data from various sources, such as video feeds, images, or sensor outputs, ensuring it is relevant and representative of the problem you’re trying to solve.
-
Data Preparation: Cleaning, augmenting, splitting, and labeling the data to ensure it’s well organized and free from inconsistencies, making it suitable for training the AI model. This step often includes tasks such as handling missing values, normalizing data, and applying transformations.
-
Data Publication and Formatting: Converting the prepared data into the appropriate format required by the AI model or training framework. This step ensures that the data is structured correctly, such as converting to formats like COCO, YOLO, or CSV, and that it’s ready for seamless integration into the training pipeline. It may also involve selecting the right data structure for efficient processing during model training.
Tools and preparations
There are multiple available tools that help with the AI data management. Below you can find a quick comparison of some of the more popular data management tools:
| Tool | Benefits | Drawbacks |
|---|---|---|
- Simple, intuitive interface - Supports various annotation types (bounding boxes, segmentation, etc.) - Automated augmentation and preprocessing - Direct integration with YOLO and other object detection models |
- Limited free tier - Requires internet access for cloud-based processing |
|
- Flexible and supports multiple data types (image, video, audio, text) - Open-source and self-hosted options available - Collaborative labeling environment |
- Steeper learning curve compared to Roboflow - Manual setup required for self-hosting |
|
- Open-source and highly customizable - Supports complex annotation tasks (object tracking, polygons, etc.) - Active community and enterprise support available |
- Can be resource-intensive - More complex interface for beginners |
|
- Free and web-based - Simple to use for quick annotations - No sign-up required |
- Lacks advanced features (e.g., automation, augmentation) - Export options are limited |
For this project, Roboflow will be the primary tool used for managing and preparing data. Roboflow’s ease of use and direct integration with popular object detection models like YOLO make it the optimal choice for this project.
Your first task will be to create a Roboflow account (if you don’t have one already):
-
Go to https://roboflow.com/ and click
Get Startedin the top-right corner. -
Choose your preferred sign-up method (such as email) and enter your name and password.
-
You’ll be prompted to create a new workspace, use "workshop" as name. This will serve as the central hub for organizing datasets and projects.
-
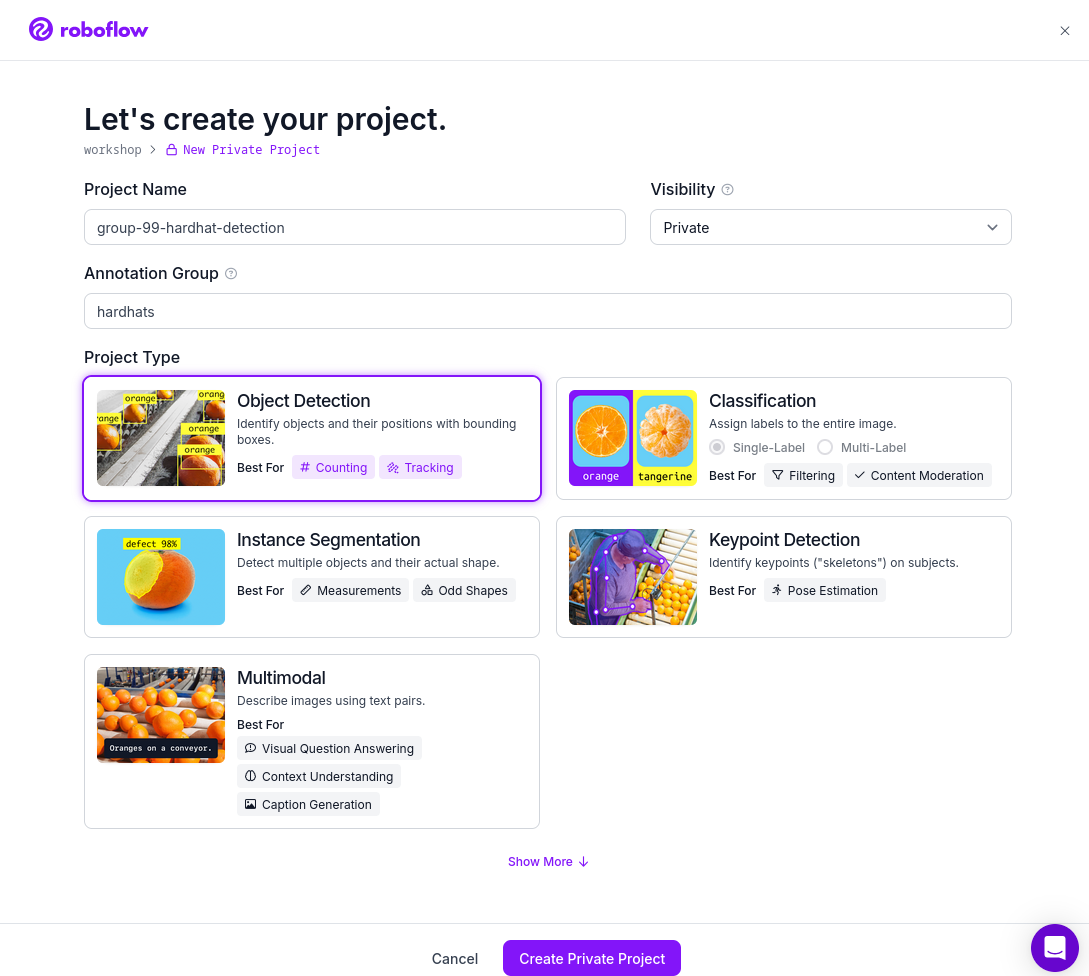
(Optional) Go to "Projects" on the left menu and click "+New Project". Give it a name (ie. "USERNAME-hardhat-detection"), include an annotation group (ie. "hardhats") and select "Object Detection" as
Project Type. This step is optional because if you fork a Dataset (explain later) it will create a new Project for you.
| Roboflow includes some restrictions to Not-Paid accounts. The most important for us is that the overall number of images in your account must be less than 10,000, so we need to mantain the size of the Dataset that we will create in the next point below that number. |
From here, you’re ready to start…
Collection

Data collection is the first step in AI model development, involving the systematic gathering and organization of data for training and validation. It starts by identifying relevant sources, including primary data from sensors, surveys, or experiments and secondary data from databases, APIs, or public datasets. The quality and scope of data directly impact model performance, making robust collection methods and quality control essential.
Beyond gathering information, data collection requires ensuring relevance, accuracy, and representativeness. This includes proper sampling, format consistency, and covering all relevant scenarios. Organizations must also address legal and ethical considerations like privacy, ownership, and consent.
A well-planned infrastructure is key to handling data volume while maintaining integrity. Secure storage, validation protocols, and proper documentation are crucial. Continuous monitoring helps identify and correct biases or gaps that could affect model performance.
In our case, you will focusing only in the data gathering more than in the data storage and access management, since we will be using the Roboflow tool that will help with those point in this specific case.
We will be using the YOLO (You Only Look Once) object detection model. YOLO requires that the data that we use to be labeled to effectively train and identify objects within an image. This aligns with the principles of supervised learning, where the model learns from labeled datasets to predict outcomes accurately, contrast with the Unsupervised or Reinforcement learning:
-
Supervised Learning: Models are trained on labeled data (e.g., images with hardhat/no hardhat labels). This ensures the model can classify and detect objects correctly. This is our current use case.
-
Unsupervised Learning: Models work with unlabeled data, identifying patterns or clusters without predefined categories.
-
Reinforcement Learning: The model learns through trial and error by receiving feedback based on its actions.
When collecting data you can perform a manual data gathering, by capturing new images/videos of the objects that you want to detect, but that’s often only done when no suitable datasets are publicly available. While gathering raw data is essential, labeling data is often the most time-consuming part of the process. Annotating thousands of images manually can introduce bottlenecks and require significant human effort. Already created pre-labeled datasets streamline the model development process by providing ready-to-use data, allowing you to focus on model tuning and experimentation. That’s why, when possible (not special data is needed), you should prioritize gathering data from datasets that are already annotated to accelerate the AI development lifecycle.
There are multiple ways to get pre-Labeled image datasets, for example:
-
Private Datasets: You can pay to be allowed to use certain private Datasets already created or you can hire a 3rd party to create your own specific Dataset
-
Public Datasets: Many datasets are freely available for computer vision tasks. Examples include COCO (Common Objects in Context) or the Open Images Dataset.
-
Open Data Repositories: Platforms like Kaggle, Google Dataset Search, and Roboflow Universe provide datasets contributed by the community.
-
Synthetic Data: Using AI or simulation tools to generate artificial but realistic datasets. This approach is useful when real-world data is scarce or expensive to obtain.
In our project, we will be using pre-labeled data from the Roboflow Universe using the already created account in Roboflow. We will use the Datasets that you find in Roboflow Universe to add images to your own "Project" in your Roboflow account.
Dataset Search
Roboflow Universe hosts a vast collection of datasets, including both original contributions and replicated datasets. When selecting the appropriate dataset for your project, the key considerations are finding relevant labels and ensuring sufficient image quantity. When it comes to dataset size, the general principle is "the more, the better." AI model performance typically shows a direct correlation with the volume of training data available. The larger and more diverse your dataset, the better your model can learn and generalize patterns.
| With a free Roboflow account, you’re limited to 10,000 images per account. |
For hardhat detection specifically, you’ll want to focus on datasets with labels such as hardhat or helmet. However, it’s crucial to understand that effective safety compliance detection requires a balanced approach. You need to identify both when workers are wearing hardhats and when they’re not. This means your dataset should include images labeled with no-hardhat or similar tags to identify non-compliance scenarios. This dual approach ensures your model can effectively distinguish between compliant and non-compliant situations, making it more reliable for real-world safety monitoring.
Now that you know what to look for, pick the source Datasets that you will be using in your project:
-
Go to Roboflow Universe
-
Select "Object Detection" in the
By Project Typefilter. This is required since other types of vision ai projects won’t include required labeled data, for example the object classification does not include the location of the object. -
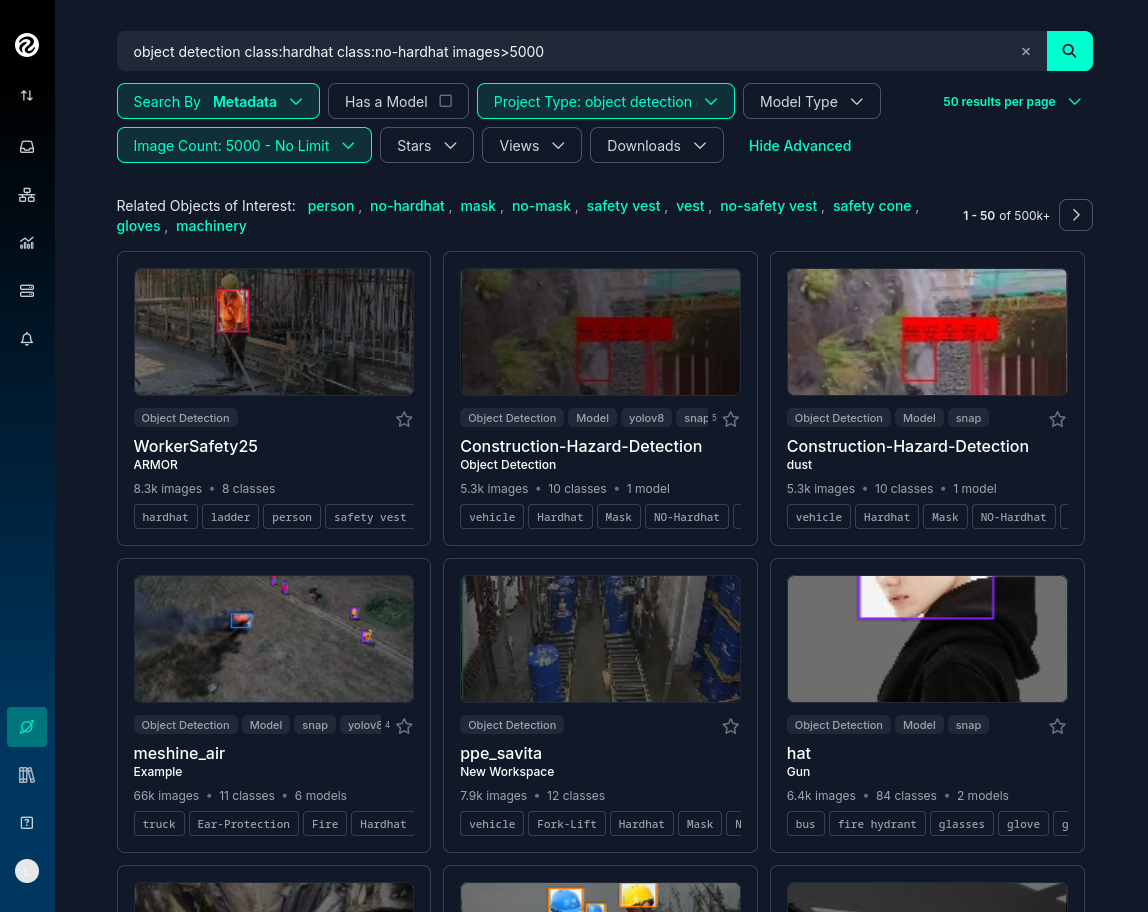
Identify one or multiple datasets with relevant labeled data by playing with the "Advanced Filters". You can add
class:<name>into the search box to only show datasets that contains data with the 'name' label, for exampleclass:hardhat.
Reaching the optimal dataset size of 10,000 images often requires combining multiple datasets from Roboflow Universe. While the platform offers an "Image Count" filter, be cautious when using it as your sole metric. This filter displays the total number of images in a dataset, not the count of images containing your specific labels of interest, which could lead to misleading results.
To accurately determine the number of relevant tags in images in a specific dataset, follow these steps:
-
Navigate to the dataset’s URL in Roboflow Universe.
-
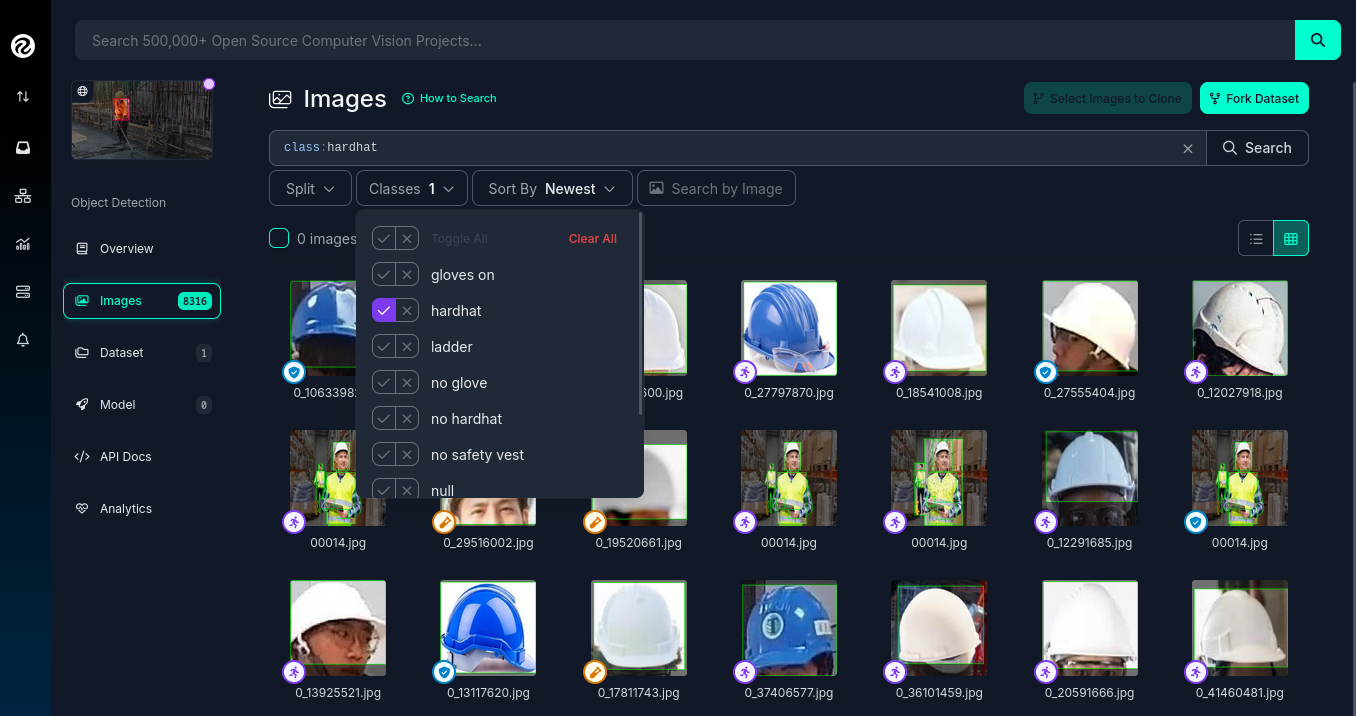
Click the "Images" button.
-
Use the Filter function to select a single target Class (label).
-
Check the pagination counter at the bottom of the page, which displays the total count (for example, 1 - 50 of 75).
-
Repeat for other classes.
| When you select multiple classes you will be applying an "AND" operator so the result will show only images where both classes appear at the same time. |
Beyond the image count, it’s essential to verify that both images and labels align with your specific use case. For instance, when detecting "helmets" in industrial environments, images of people cycling wearing "helmets" would be inappropriate for your dataset. Dataset image inspection is crucial before implementation, as including irrelevant images could significantly skew your model’s predictions.
Once you have choosen your source Datasets, take note of their Roboflow Universe URLs since you will need them in the next step.
|
If you don’t find appropiate source Datasets you can use this one: |
Image Gathering
Now you need to create your own Dataset out of the labeled images of the source Dataset/s. In order to do that you have two options: you can fork an entire Dataset in your account, or you can clone certain specific images only.
Fork Dataset
When you fork a Dataset you "copy" it into your account. This is useful if you found a single Dataset that is similar to what you are looking for and you don’t need to choose few images from multiple different Datasets.
If you selected multiple Datasets in your search, you start by forking the one that is closer to what you need and then Clone images from additional Datasets later.
Also forking is useful if you encounter issues while cloning images since forking typically results in fewer issues than cloning in Roboflow. Even if an error appears, the images will still be copied to your account.
If you want to fork a Dataset follow these steps:
-
Navigate to the dataset’s URL in Roboflow Universe.
-
Click the "Images" button.
-
Click the "Fork Dataset" button.
-
Confirm and wait until fork is done.
-
Optionally, rename the Project in your account (Fork keeps the original name) by selecting the option when you clik on the three dots.
Cloning Images
Sometimes cloning the images with the required labels makes more sense than forking an entire Dataset, or you want to add more images into your already forked Dataset.
To clone a subset of images in a Dataset you have to:
1- Navigate to the dataset’s URL in Roboflow Universe.
2- Click the "Images" button.
3- Use the Filter function to select your target Class (labels).
4- Click the box right above the first image to select all images.
Probably the Dataset will have more than 50 images that you want to clone. You can go page by page selecting all images but it’s a better idea to show all images in a single page before clicking the selection box. In order to do that look in the URL line for the variable pageSize=50 and change it to the number of images that you want to clone, for example https://universe.roboflow.com/pped/pped-batch1/browse?queryText=class%3Ahelmet&`pageSize=3500`&startingIndex=0&browseQuery=true
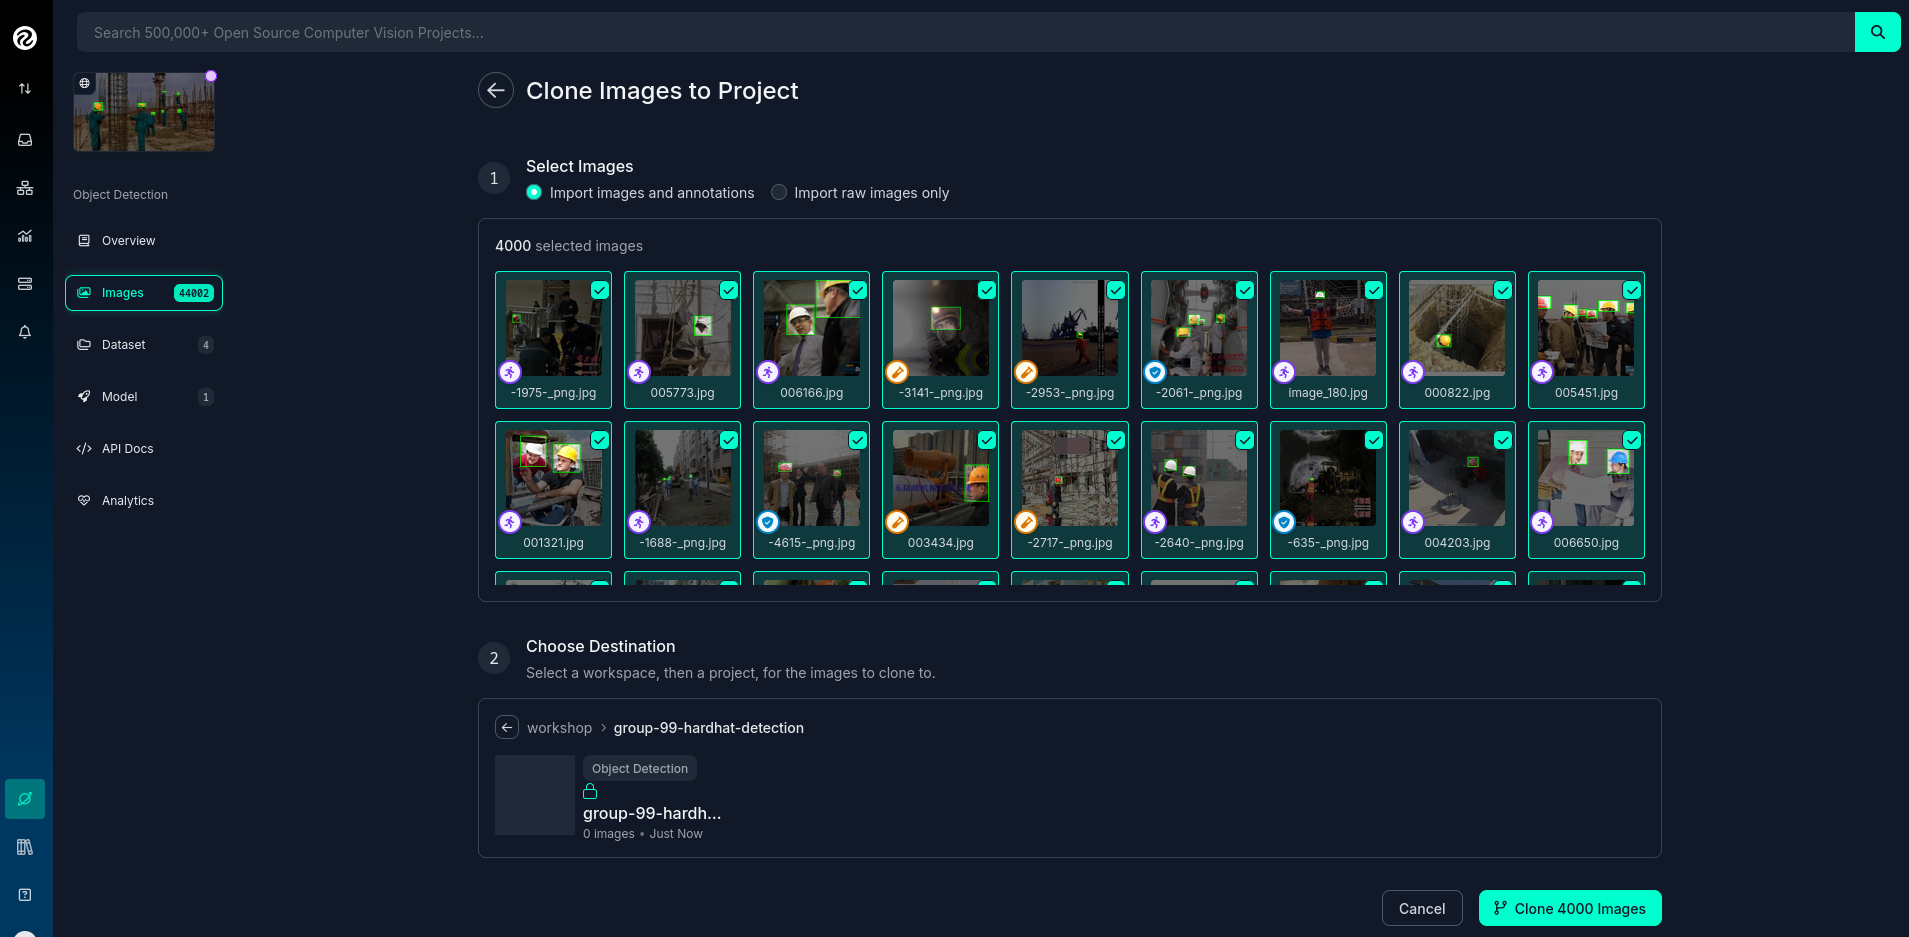
|
5- Check that all images are selected and then click "Clone <number> Selected Images" on the top right corner. Select the Workspace and the Project that you created before and click "Clone <number> Images"
| If the page does not respond or you find errors, try to clone images in batches of 900 images instead of performing a single clone with a high number of items. |
Repeat these steps for each class in each of your selected source Datasets until you have a balanced dataset with an overall image number close to 7,000 or 8,000 items (leave space to include a new label later)
Manual Image Upload
If you have time and energy, you can try to load new images and perform the labeling on your own, to experience and have an idea of the effort that it takes to annotate a full Dataset.
Before starting with the labeling, you will need to upload new images (although you can also add/modify labels in the already available images)
In order to upload new images you have to:
-
Navigate to the Project’s URL in your Roboflow account.
-
Click the "Upload Data" on the left menu.
-
Select your images.
-
Click "Save and Continue".
| Right after the upload Roboflow will show a menu to start annotating the image. Hold that page if you want since you can continue from this point in the next step (Preparation > Labeling). |
Preparation

Data preparation is a critical phase in the AI development process, serving as the bridge between raw data collection and model training. This step ensures that data is cleaned, organized, and optimized for analysis, directly influencing the quality and performance of AI models.
The process typically includes four main subtasks: cleaning, augmenting, labeling data, and splitting datasets. Cleaning involves removing noise, inconsistencies, or irrelevant elements from the dataset to ensure its reliability. As part of this step, datasets are also split into training, validation, and test sets, ensuring proper organization and evaluation during the AI workflow. Data augmentation expands the dataset by applying transformations like rotations, flips, and color adjustments, which helps models generalize better to unseen scenarios. Labeling data, especially in supervised learning, assigns meaningful annotations to input data, such as bounding boxes for object detection or class names for classification.
Effective data preparation is essential because high-quality, well-prepared data leads to more accurate predictions and reduces the risk of bias in AI models. Without this step, even the most sophisticated algorithms may underperform, highlighting the importance of investing time and effort in this foundational stage.
Labeling
Labeling assigns the necessary annotations to raw data, making it usable for supervised learning tasks, but annotation could be different things, from just a name to location in the image. It will depend on what’s the goal of your AI model.
Visual AI models can take various approaches depending on the objective:
-
Object Classification: Determines the type of object in an image but does not specify its location.
-
Object Detection: Identifies and localizes objects within an image.
-
Segmentation: Divides the image into segments, classifying each pixel into different object categories.
-
Pose Estimation: Tracks and identifies the key points or joints of objects (typically used for human posture recognition).
-
Object Tracking: Follows objects across frames in a video, maintaining their identity over time. Useful for surveillance or autonomous driving.
-
Action Recognition: Classifies actions happening in videos by analyzing sequences of frames, widely used in video surveillance and human activity recognition.
-
Anomaly Detection: Identifies unusual patterns in visual data, often used for defect detection in manufacturing.
Object detection is our focus, as the goal is to identify workers wearing hardhats and detect their locations in the image. Unlike object classification, object detection requires detailed annotations that highlight the exact location of the object within the image. This involves:
-
Drawing bounding boxes around the target objects (e.g., hardhats).
-
Assigning labels to each box (e.g., 'hardhat' or 'no hardhat').
That means that in the case of object detection (our case), labels include both class names and spatial coordinates. Accurate labeling is crucial because mislabeled data can lead to poor model performance.
Data management tools, including Roboflow, usually provide a way to add and label images. We reused images from other Datasets that are already labeled but you can re-lable some of them or just manually upload new images and perform the annotation on them.
If you upload new images manually, once the images are uploaded, Roboflow gives you three options to annotate (add labels) your images: Auto Label (Roboflow automation), Maunal Labeling and Roboflow Labeling (hire Roboflow people to label your images). In our case we will proceed with Manual Labeling.
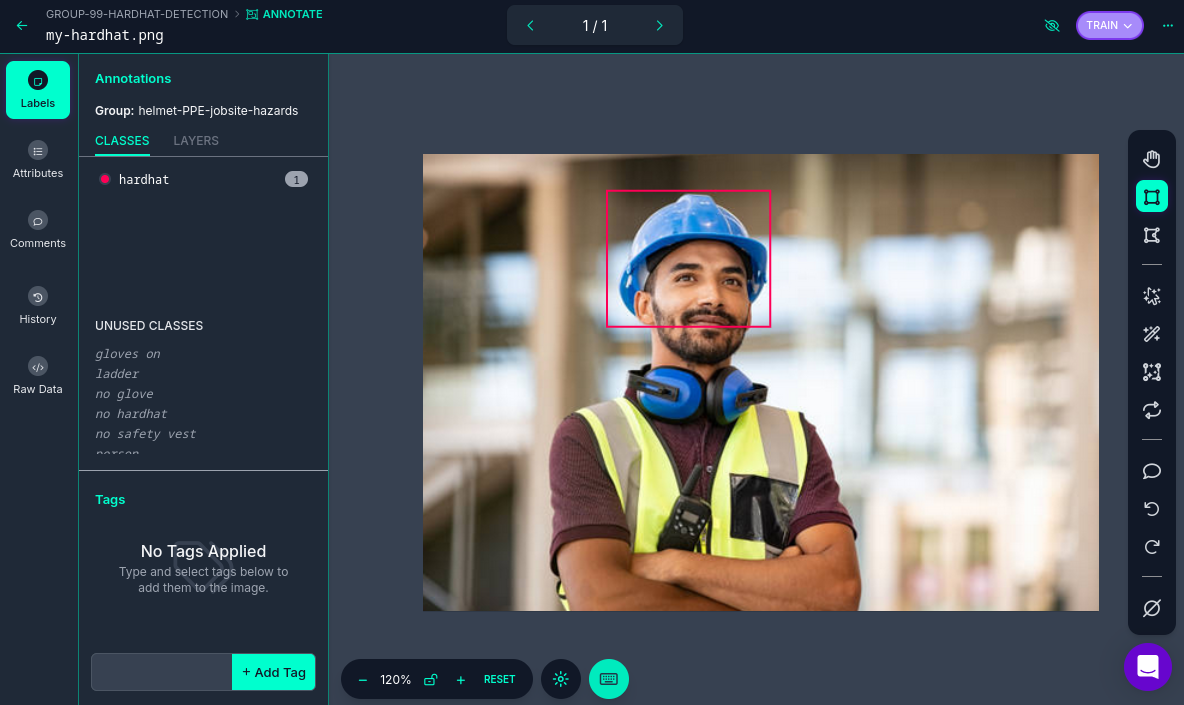
Once you have assigned images to be annotated, you can follow these steps:
-
Navigate to the Project’s URL in your Roboflow account.
-
Click the "Annotate" on the left menu.
-
Click "Start Annotating" in the top right corner.
-
Make a selection in the image and assign a class.
-
Repeat for each label on each image…
-
Go back to the "Annotate" page and click "Submit for Review" on top right corner.
-
Since you are the only one in your Project, you can click on the "Review" column where the new images will appear.
-
Select images and start Approving or Rejecting the labeling.
-
Once done, go back to the Annotate page and click "Add Appoved to Dataset" on top right.
-
Click "Add Images".
Cleaning
Cleaning data involves identifying and correcting errors, inconsistencies, and irrelevant elements in the dataset. This step ensures the data is accurate and meaningful for training. Common cleaning tasks include removing duplicates, addressing missing values, and standardizing formats. Clean datasets reduce noise, improving the reliability of the AI model and preventing it from learning unreal correlations.
For object detection projects, cleaning involves verifying annotations, removing irrelevant or mislabeled images, resolving overlaps, and balancing class representation to ensure dataset accuracy and relevance.
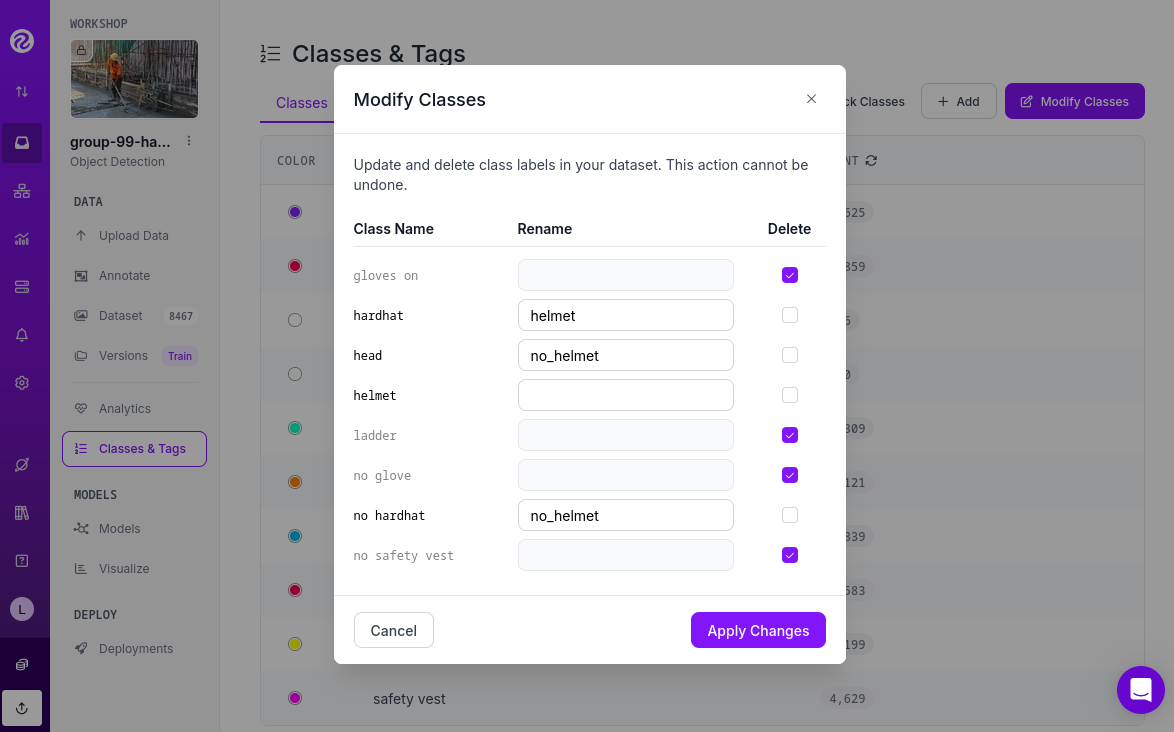
In our scenario, it’s possible that during the previous step we forked a Dataset, and as a result, it may contain more classes (labels) than needed. In this case, you would need to remove the unnecessary ones. Alternatively, if we’ve added additional images from a different Dataset with a different naming convention for the classes, you might want to standardize them by unifying all the class names under a consistent naming scheme, like in the example below where you have head and no hardhat classes for labeling people without hardhats:
To maintain consistency with the applications we’ve developed, we will be using two labels: helmet and no_helmet. Please adjust your class names accordingly to align with this naming convention.
|
You can modify or remove classes in your Roboflow Project:
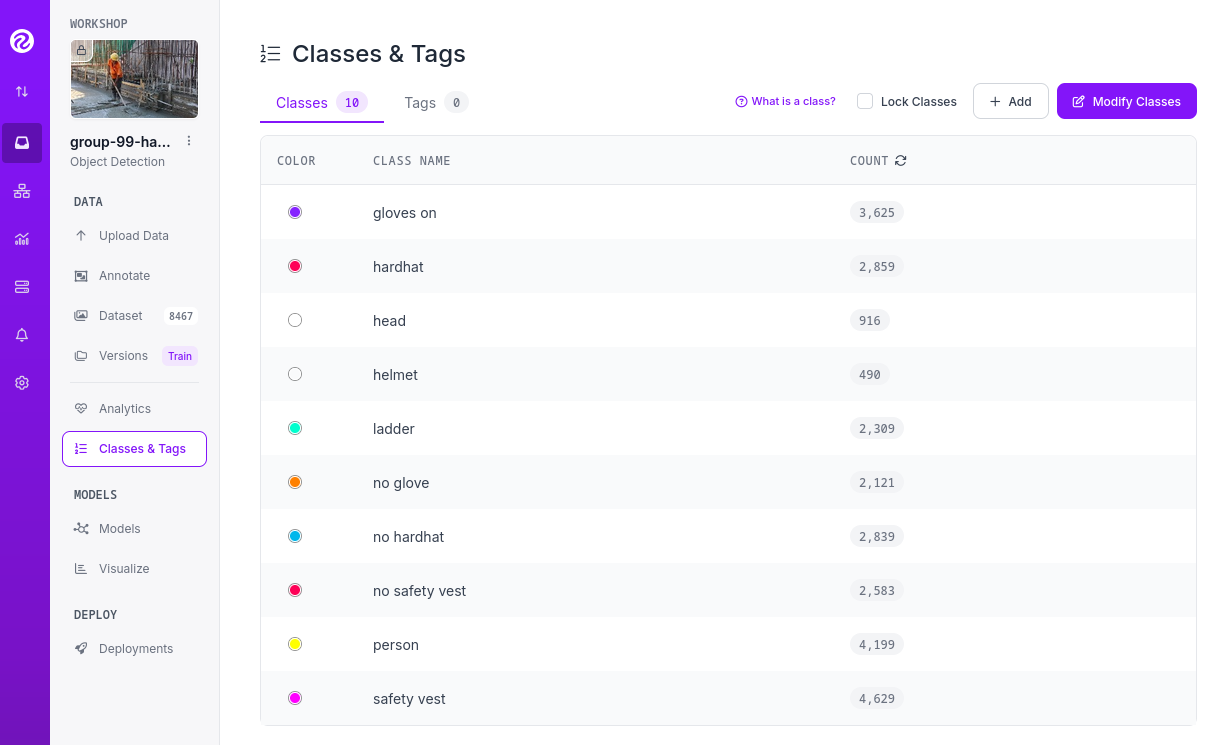
-
Navigate to the Project’s URL in your Roboflow account.
-
Click the "Classes & Tags" on the left menu.
-
Click "Modify Classes" on the top right corner.
-
Introduce a new name in the "Rename" box of the classes that you want to modify.
-
Select the "Delete" box in the classes that you want to Delete.
-
Click "Apply Changes".
-
Confirm Changes.
It’s important to note that when you delete a class, you are only removing the labels associated with that class, not the images that contain it. As a result, you may now have images without any labels in your Dataset. To reduce noise and minimize the size of your Dataset, it’s recommended to remove these unlabeled images.
You need to look for images with no labels in your Dataset and remove them:
-
Navigate to the Project’s URL in your Roboflow account.
-
Click the "Dataset" on the left menu.
-
Filter by Class null".
-
(optional) Change the
pageSizeon the URL line as explained before to show all images in a single page. -
Click the box above the first image to select all images.
-
Cick "Actions" and select "Remove from Project".
-
Confirm deletion.
| Deletion of a high number of images could take some time. |
Now is a good time to review the number of images in your Dataset (the more images you have, the better, but keep in mind the 10,000-image limit for our free account) and the distribution of labels per class. By navigating to "Classes & Tags," you can check how many labels exist for each class. Ideally, you should aim for a balanced distribution between both classes.
If you find that you have few labels of one class or those are unbalalanced and you are under the 10,000 image limit, it is recommended (but not required) that you go back to the Data Collection step.
Splitting
Splitting data refers to dividing a dataset into separate subsets for training, validation, and testing, ensuring the AI model is built and evaluated on independent data segments. This practice prevents overfitting and ensures reliable performance metrics. Careful allocation of data across these splits ensures a robust and credible AI development pipeline.
These are the most common splits:
-
Training Set: This subset is used to teach the model by iteratively adjusting parameters to minimize errors. It typically makes up 60-80% of the total dataset.
-
Validation Set: During training, this subset helps tune hyperparameters and monitor performance to avoid overfitting. It generally accounts for 10-20% of the dataset.
-
Testing Set: Held out until the end, this subset provides an unbiased evaluation of the model’s generalization to unseen data. It typically comprises 10-20% of the total dataset.
In order to assigning the split sizes in your Project do the following:
-
Navigate to the Project’s URL in your Roboflow account.
-
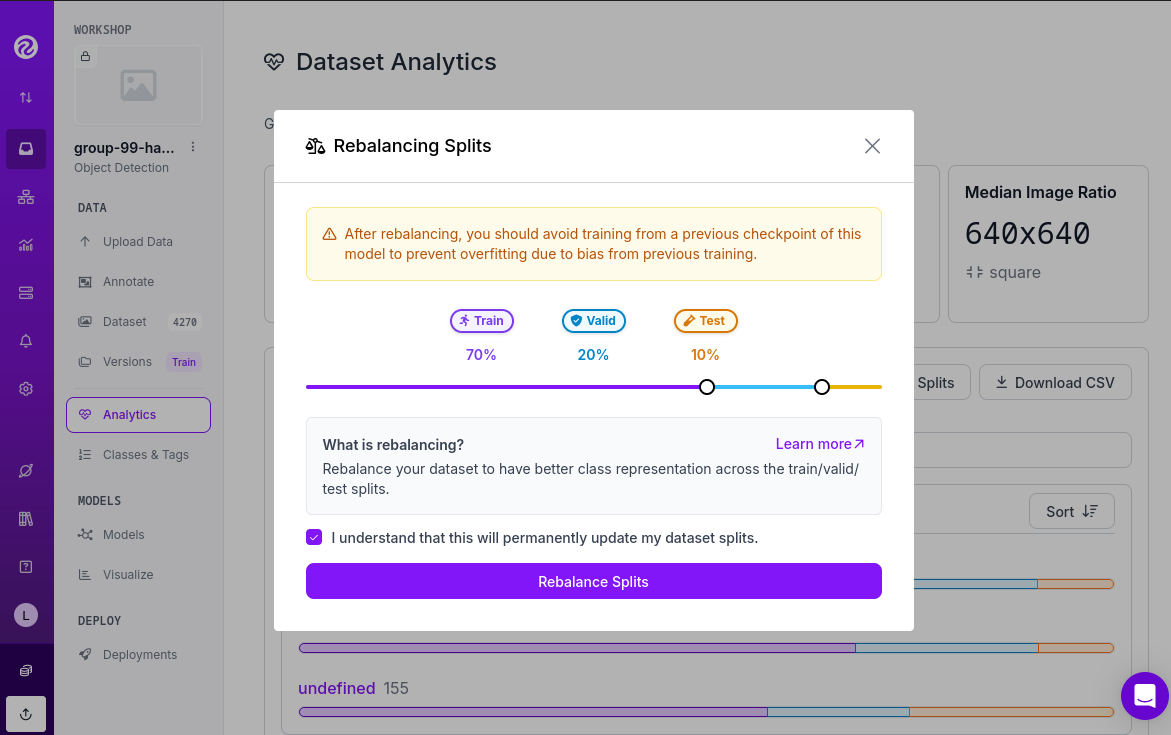
Click the "Analytics" on the left menu.
-
Besides reviewing information about your images and your current splits, you can click "Rebalance Splits".
-
Pick your values moving the dots accross the line.
-
Click on the disclaimer box and click "Rebalance Splits".
Augmenting and other Preprocesing actions
Data augmentation artificially increases the size of the dataset by applying transformations such as cropping, rotating, flipping, or changing brightness. These variations simulate diverse conditions that the model may encounter in real-world scenarios. Augmentation not only reduces the likelihood of overfitting but also enhances the model’s ability to generalize to new, unseen data.
Roboflow offers a feature to perform data augmentation when creating a Dataset "version" from the images in your Project. In Roboflow terminology, a Dataset version is a static snapshot of your Dataset that’s used to train your model.
These are the augmentation techniques offered:

Roboflow offers two types of augmentation: one that manipulates the entire image (copy the image and then flipping or rotating it to create new variations), and another that copies the image while altering only the "content" within the Bounding Box (the area where the label is located).
Along with data augmentation, Roboflow gives you the oppotunity to perform additional preprocessing to your Dataset when you create a new "Dataset Version":
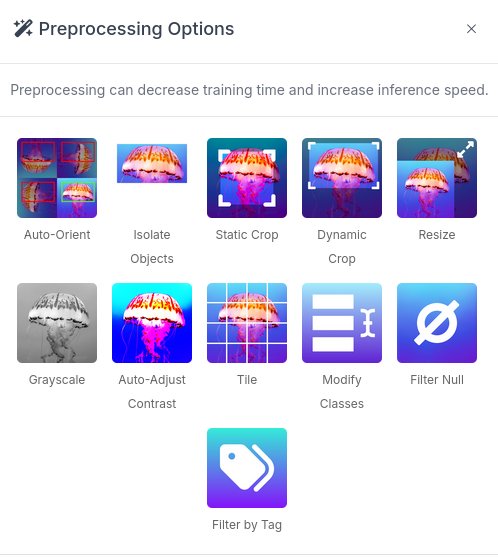
Preprocessing actions like greyscale conversion, resizing, and contrast adjustment help simplify data, enhance important features, and improve model performance. for example Greyscale reduces the image’s dimensionality from three channels (RGB) to one, which can make learning faster and computationally less expensive, especially when color information isn’t crucial for the task, or Resize ensures all images are the same size, making them compatible for input into the model while also reducing the computational load, which is essential for efficiency in training and inference.
Now you have to create a new Dataset Version:
-
Navigate to your Project’s URL in your Roboflow account.
-
Click on "Versions" in the left menu and select the version to be used.
-
If you’ve already applied data splitting, you’ll be prompted to apply additional preprocessing actions. You can add any preprocessing steps you wish, or leave it blank, then click "Continue."
-
Select the augmentations that make sense for your use case (for example, vertical flipping may not be appropriate for your task), or leave the selection empty, then click "Continue."
-
Choose the final size of your Dataset, including the augmentations. Note that "augmented" images do not count toward the 10,000 image limit in your free account. However, keep in mind that a large number of images can increase training time. Also bear in mind that it’s generally better to have a diverse set of original images rather than relying on synthetic augmentations.
| You might want to rename your version. You can do it by clicking "Edit" on the top right corner. |
Dataset Publication and Formatting

Dataset Publication and Formatting is a critical step that bridges the gap between data preparation and model training. It ensures the dataset is in the right structure, tailored to the specific requirements of the model or framework you are using. By defining the appropriate format and organization, this step optimizes data processing efficiency and supports seamless integration into the model training pipeline, allowing the model to effectively learn from the data provided. This ensures the model can access and process the data in the most efficient way possible.
Roboflow performs the formatting automatically when you Download/Access the Dataset. In this workshop we will directly access the data from Roboflow instead from a downloaded file but we will also show download the dataset to show what’s inside the Dataset ZIP file.
If you want to access directly the Dataset for model training you will need a specific piece of code (depending your your formating) that you have to include in your training pipeline/script. Roboflow provides such code by doing the following:
-
Navigate to the Project’s URL in your Roboflow account.
-
Click the "Versions" on the left menu.
-
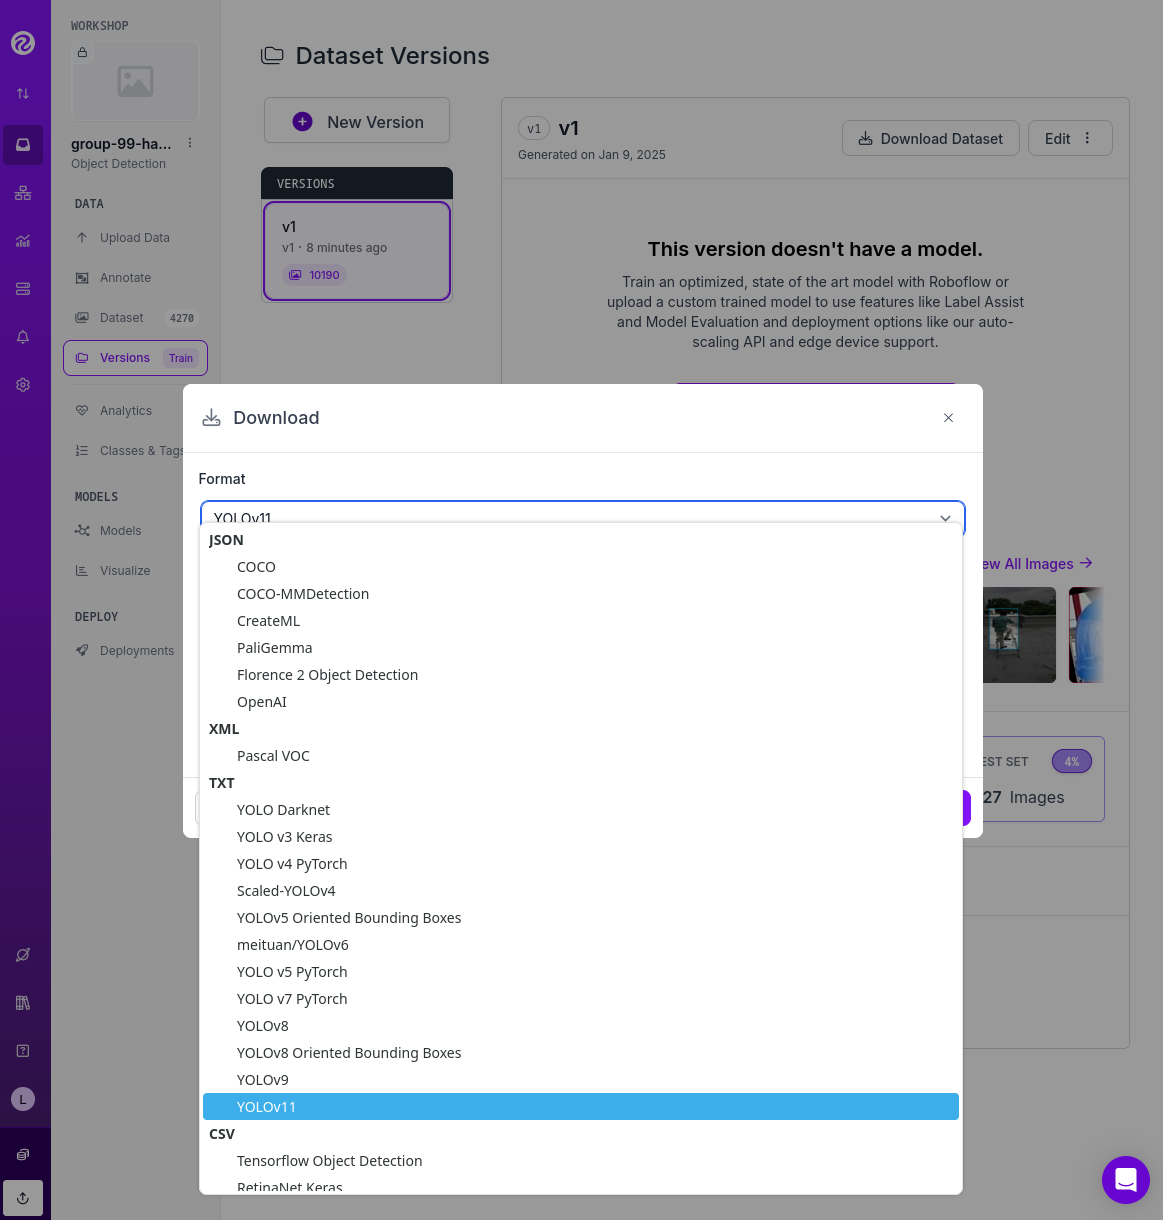
Click on "Download Dataset" on top right corner.
-
Select the format. We will be using a YOLOv11 based model.
-
Select "Show download code" radio button.
-
Unselect "Also train" option if it appears as an option.
-
Click "Continue".
You get a piece of code, copy it because you will need them later. The generated code will be similar to this one:
!pip install roboflow

from roboflow import Roboflow
rf = Roboflow(api_key="xxxxxxxxxxxxxxxxxxxxx")
project = rf.workspace("workspace").project("USERNAME-hardhat-detection")
version = project.version(1)
dataset = version.download("yolov11")| Copy and save this code since you will need it in the next Model Development section |
That’s all you need to continue to the next section, but if you are curious about the YOLO formating (metadata) and how the Dataset is organized you can Download the Dataset and take a look at that compressed file.
To format and download the Dataset you have to:
-
Navigate to the Project’s URL in your Roboflow account.
-
Click the "Versions" on the left menu.
-
Click on "Download Dataset" on top right corner.
-
Select the format. We will be using a YOLOv11 based model.
-
Select "Download zip" radio button.
-
Unselect "Also train" option.
-
Click "Continue".
Once downloaded, you can uncompress the zip file and take a look at the file structure for YOLOv11 format. You will see the images in three different directories, one per split, and YAML and TXT files.
.
├── data.yaml
├── README.roboflow.txt
├── test
│   ├── images
│   └── labels
├── train
│   ├── images
│   └── labels
└── valid
    ├── images
    └── labels
Each split directory has two subdirectories, one where you find the images and another with txt files (but same name than the image) where the label metadata (class number and location) is contained.
If you open the YAML file you will see the Dataset metadata, including the class names (instead of numbers) and location of the directories with the splitted data.
train: ../train/images
val: ../valid/images
test: ../test/images

nc: 3
names: ['helmet', 'no_helmet', 'undefined']

roboflow:
  workspace: workshop-igjqz
  project: user99-hardhat-detection
  version: 1
  license: CC BY 4.0
  url: https://app.roboflow.com/workshop-igjqz/user99-hardhat-detection/1
Solution and Next Steps
In this section you have prepared the Dataset with labeled images using Roboflow as Data Management tool.
If you want to take a look to the Section solution to double check what you did or if you need an already prepared Dataset that you can just clone in order to continue with the next section, you can use the following Roboflow Project:
If you want to directly use it, please remove the images labeled with hat, as indicated above, since this annotation will be addressed in a later section. Additionally, you will need to delete Dataset Version v2, which includes the dataset with those extra images and labels.
|
Mock Training Dataset
Now you’re ready to proceed to the Model Development section. However, it’s important to keep in mind that model training is a time-intensive process. Depending on your hardware and hyperparameter configuration, training can take anywhere from several hours to multiple days. If your goal is to complete this workshop in a single session, you’ll need to consider an alternative approach: the Mock Training."
Using the *Mock Training dataset involves having significantly reduced number of images to shorten the training time. While this means the resulting model won’t be viable for real-world use, it will allow you to complete all the steps in the training phase within the limited timeframe.
| A pre-trained model will be provided as the solution in the Model Development section, which you can use to complete the subsequent steps. |
How can you reduce the dataset size for training? The simplest and most effective approach without deleting images is to create a new "Dataset Version" by adjusting the dataset splits. For example, you can reduce the number of images in the training and validation sets to approximately 5–10 images each, while assigning the remaining images to the test set and then use that "Version" during the training phase.