Bonus: Building the APPs
Although application development is not covered in this workshop, it plays a fundamental role and can also be carried out on OpenShift. You can deploy on top of OpenShift several tools to support application development, such as:
-
OpenShift Developer Hub: This internal developer portal centralizes access to resources, templates, and documentation, accelerating the onboarding process and standardizing application development across teams. It ensures consistency and visibility into microservices and APIs.
-
OpenShift Dev Spaces: OpenShift Dev Spaces provides cloud-based development environments accessible directly from the browser. It offers pre-configured, containerized workspaces that mirror production, ensuring developers can write, test, and debug code in an environment that reflects the final deployment conditions.
-
OpenShift Pipelines: Built on Tekton, OpenShift Pipelines automates CI/CD workflows, enabling fast, consistent builds, tests, and deployments of containerized applications. This tool ensures rapid iteration and integration, reducing downtime and accelerating feature delivery.
-
Quay Container Image Registry: A secure container image registry stores and manages application images, ensuring that developers can reliably push, pull, and deploy containers to different environments. It supports versioning and helps enforce security and compliance policies.
-
OpenShift GitOps: Implements GitOps practices for application deployment and lifecycle management.
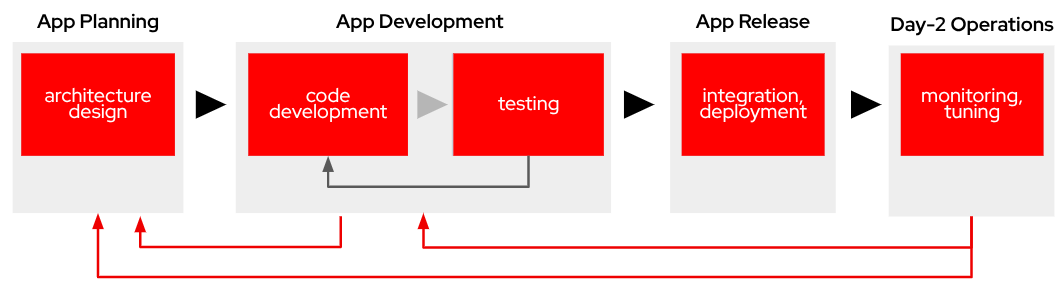
All of these tools can be utilized throughout the application development lifecycle, which mirrors the MLOps cycle we are following in this workshop. Both cycles share common stages, such as:
-
App Planning: Architecture Design: This foundational phase focuses on system design decisions, technology stack selection, and establishing the technical approach. It sets the blueprint for the entire application development lifecycle.
-
App Development: This encompasses the core development activities:
-
Code Development: Writing application code following established design patterns and best practices. This involves implementing features and functionality according to requirements.
-
Testing: Comprehensive testing. This phase often requires iteration back to code development to address identified issues.
-
-
App Release: Integration, Deployment: After successful testing, the application is prepared for production, involving integration with other systems and services, deployment through CI/CD pipelines,final verification in staging environments and production rollout
-
Day-2 Operations: Monitoring, Tuning: Post-deployment activities focus on application performance monitoring, resource utilization optimization and performance tuning based on real world usage
Building the Microservices
|
If you don’t want to create the images on your own you can use the following:
|
When planning to create a container image, it’s essential to consider the system architecture of the device where the application will run. For deployments on Public Cloud or Core Data Centers, this is usually straightforward since the architecture will likely be x86. However, for Edge use cases, the situation is different.
In our case, we will build x86 container images for the services that are running on the Cloud and container images for both x86 and ARM architectures for the ones running at the Edge, leveraging the multi-architecture container image feature available in certain Container Image Registries like Quay.
You can find the Containerfiles for each application in the src directory of each application’s URL shared above, along with the application code and other associated files. Feel free to clone the repository and use these files for your own builds.
| The build process is closely tied to the architecture of the system you’re using. If you build on an ARM-based system, the resulting container images will default to the ARM architecture unless you specifically perform cross-compilation (which we’ll cover in more detail below). For this workshop, we will be using an x86-based system for the build process. |
For this workshop, we will be building the container images locally instead of utilizing an automated CI/CD pipeline. For the applications running on the Cloud (x86 only) you just need to build the images in the normal way:
cd <application src directory>
podman build -t <registry>/<namespace>/<container image name>:<tag> .
podman login -u <user> <registry>
podman push <registry>/<namespace>/<container image name>:<tag>
| Remember to make the images public once you pushed into the registry for simplicity, otherwise you will need to configure the registry credentials in order to pull the images. |
For the applications that will run at the Edge, we need to create container images for both x86 and ARM architectures. If you’re working on an x86 system, you can build the x86 images using the same procedure as outlined earlier. But what about the ARM images? Strictly speaking, you would need access to an ARM system to build ARM-based images. However, you can use cross-compilation tools to create ARM images directly on x86 systems (and vice versa). In this section, we’ll focus on how to perform cross-compilation on x86 RHEL-based systems.
If your laptop is running a Fedora/RHEL based Linux distribution, you can leverage qemu-user-static to enable the creation of ARM images (In MacOS, even with M3 chip, you can direcly brew podman with the --platform option as shown below, there is no need to install the qemu-user-static package)
What is qemu-user-static? qemu-user-static is a versatile user-space emulator that enables programs compiled for one architecture to run on another. By using this tool, you can emulate the ARM architecture on an x86 system, making it possible to build and test ARM container images without requiring native ARM hardware.
Before building the ARM container images, follow these steps to set up qemu-user-static:
1- Install the qemu-user-static package in your system
sudo dnf install podman qemu-user-static2- Run the qemu-user-static container to enable multi-architecture support
sudo podman run --rm --privileged multiarch/qemu-user-static --reset -p yesWith these steps completed, you can proceed to build ARM-based container images on your x86 system as if you were working on native ARM hardware.
In order to create the create the ARM image you will need to run the podman build but including the desired ARM architecture with the argument --platform linux/arm64.
podman build --platform linux/arm64 -t <arm image>:<tag> .
From now on, it’s recommended to always specify the platform explicitly when building container images (e.g., linux/arm64 for ARM and linux/amd64 for x86…yes, the naming is quite similar). This is because Podman "remembers" the last platform you used during the build process, and without explicitly setting the platform, you might unintentionally create an ARM image when you only intended to build a standard x86 image. Explicitly defining the platform ensures clarity and prevents unexpected results.
|
It’s a good idea to mention in the image tag if that image is intended to be used in an x86 or ARM system (e,g, <image>:arm-v1)
|
At this point you will have the Camera Stream Manager and Actuator service images for both ARM and x86 systems but you had to use different tags, otherwise you will be "overwriting" one image with other, this is not ideal since the image image name will be different depending on the system that you are deploying to.
But that’s not a big problem since the multi-arch container images exist.
You can create a "pseudo container image" called a manifest that references multiple images for different architectures. At deployment time, the runtime automatically selects the appropriate image based on the system architecture. This allows you to use the same container image name and tag consistently, regardless of the system on which it is deployed.
Let’s create a multi-arch container image and push it into our registry.
1- Create the manifest
podman manifest create <registry>/<namespace>/<container image name>:<shared tag>
2- Add the images that you created for both architectures
podman manifest add <registry>/<namespace>/<container image name>:<shared tag> <registry>/<namespace>/<container image name>:<x86 tag>
podman manifest add <registry>/<namespace>/<container image name>:<shared tag> <registry>/<namespace>/<container image name>:<arm tag>
3- Push the manifest. Pay attention that the command is podman manifest push, not just podman push
podman manifest push <registry>/<namespace>/<container image name>:<shared tag>
Now you can use the <registry>/<namespace>/<container image name>:<shared tag> to deploy the container seamlessly on both x86 and ARM systems, with the runtime automatically selecting the correct architecture-specific image.