Model Training
Training machine learning models in production environments is not as simple as running a script or experimenting in a notebook. A robust pipeline is essential to ensure:
-
Scalability: Handle large datasets and distribute computational workloads across resources efficiently.
-
Reproducibility: Replicate training runs for consistent model performance.
-
Automation: Automate steps like data preprocessing, model training, evaluation, and deployment, reducing manual errors.
-
Monitoring and Governance: Track metrics, manage versions, and ensure compliance and performance.
Without a pipeline, the training process becomes ad hoc and error-prone, leading to inconsistent results and increased operational risks.
Elyra Pipelines, built on Jupyter Notebooks, offer an accessible way to prototype workflows. However, they lack the scalability, integrations, and enterprise-grade features required for production. For example:
-
Inefficiency with large-scale data or distributed workloads.
-
Tight dependency on Jupyter Notebook, unsuitable for high-availability systems.
-
Limited monitoring tools, storage integrations, and governance capabilities.
While Elyra is excellent for prototyping, Kubeflow Pipelines stands out as a robust, production-ready solution. Built for Kubernetes, Kubeflow supports the entire machine learning lifecycle—from data preparation to deployment—with features like:
-
Seamless scalability and fault tolerance.
-
Integration with CI/CD platforms, monitoring tools, and storage systems.
-
Modular pipelines with version control and strong community support.
For enterprises seeking a scalable MLOps solution, Kubeflow on OpenShift AI is a powerful choice.
In this section you will follow the steps below:

Tools and preparations
We’ll use the following tools to train a YOLO model to detect hardhats:
-
OpenShift AI: Manage Kubeflow pipelines within a Kubernetes-based environment. Leverage the Model Registry to store model version along with their metadata (e.g., training parameters and metrics).
-
GitHub: Version control and collaborative development for pipeline definitions.
-
OpenShift Data Foundation: Scalable, high-performance object storage for model outputs.
-
Quay Container Registry: Used to push the container image that will contain the trained AI model.
-
OpenShift Pipelines: An automated CI/CD workflow powered by Tekton, which runs containerized tasks in OpenShift.
These tools are pre-configured at this point, allowing you to dive straight into pipeline development.
Pipeline Creation

If you want to run Pipelines in OpenShift AI, you will need to add into your AI project a Pipeline Server resource definition.
| If this step was completed during the Elyra Pipelines setup, you’re all set. However, if you skipped that part, you’ll need to follow the steps to create the Pipeline Server now before continuing. |
To create a Pipeline Server:
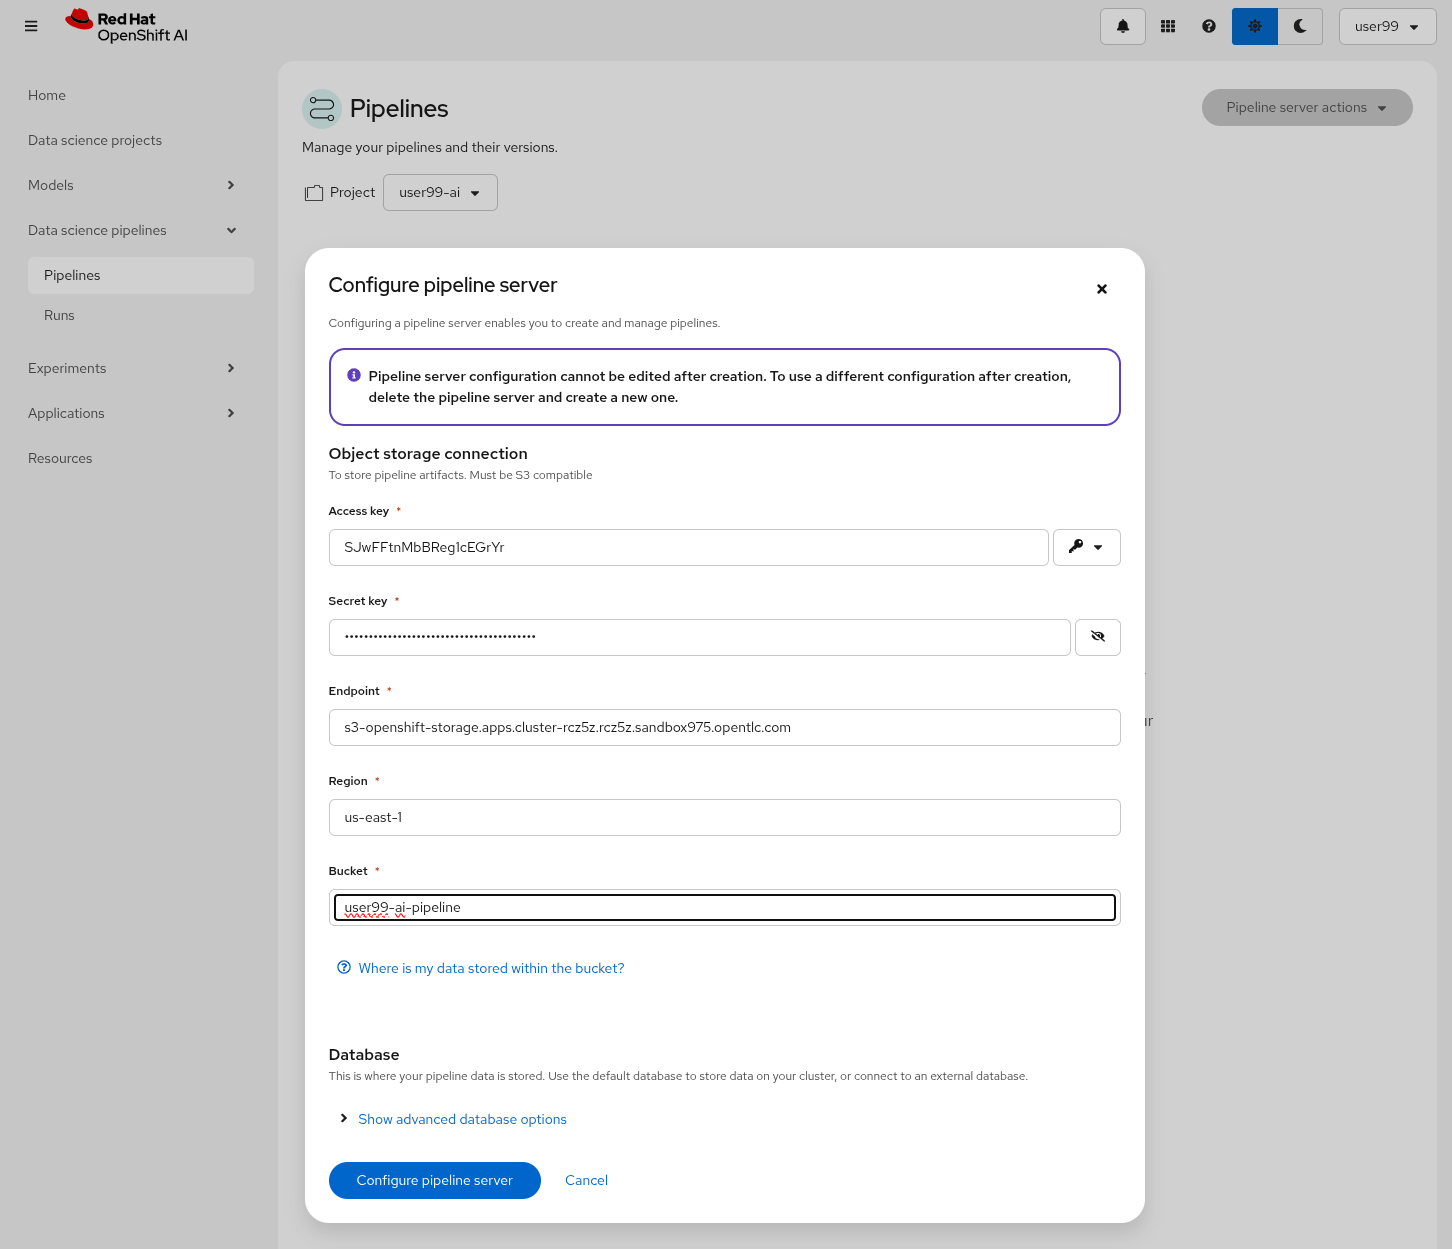
1- Navigate to "Data Science Pipelines > Pipelines" in OpenShift AI and configure a new pipeline server.
| Double-check that you are in the right Project: USERNAME-ai |
2- Fill in the Data Connection information:
-
Access key:
OBJECT_STORAGE_PIPELINE_ACCESS_KEY -
Secret key:
OBJECT_STORAGE_PIPELINE_SECRET_KEY -
Endpoint:
s3-openshift-storage.apps.CLUSTER_DOMAIN -
Region: Keep the Region. If it’s it is better to include any string (e.g.
local). -
Bucket:
USERNAME-ai-pipeline
3- Click "Configure pipeline server".
4- Once the configuration is ready, restart any running workbenches to apply the updates.
| To verify that the Pipeline Server has been successfully loaded into your Jupyter Environment, open the Workbench and navigate to "Runtimes" (represented by a gear icon in the left menu). Here, you can confirm that the runtime configuration has been automatically loaded. If the Data Science Pipelines runtime configuration is empty try to restart your workbench once the pipeline server is active. |
The training pipeline is implemented using Python. OpenShift AI Workbenches provide a coding environment with an integrated IDE.
Let’s deploy a Code Workbench to get started:
1- Deploy the Workbench: Go to OpenShift AI > Data Science Projects, and select your project.
2- In the Workbenches tab, click Create Workbench. Name it (e.g., "Object Detection Pipeline Code") and choose the code-server type. Keep the default local volume; no need to configure Object Storage or GPUs. Click Create Workbench and wait for the deployment to complete.
3- Access the Workbench: Once the Workbench is ready, open it.
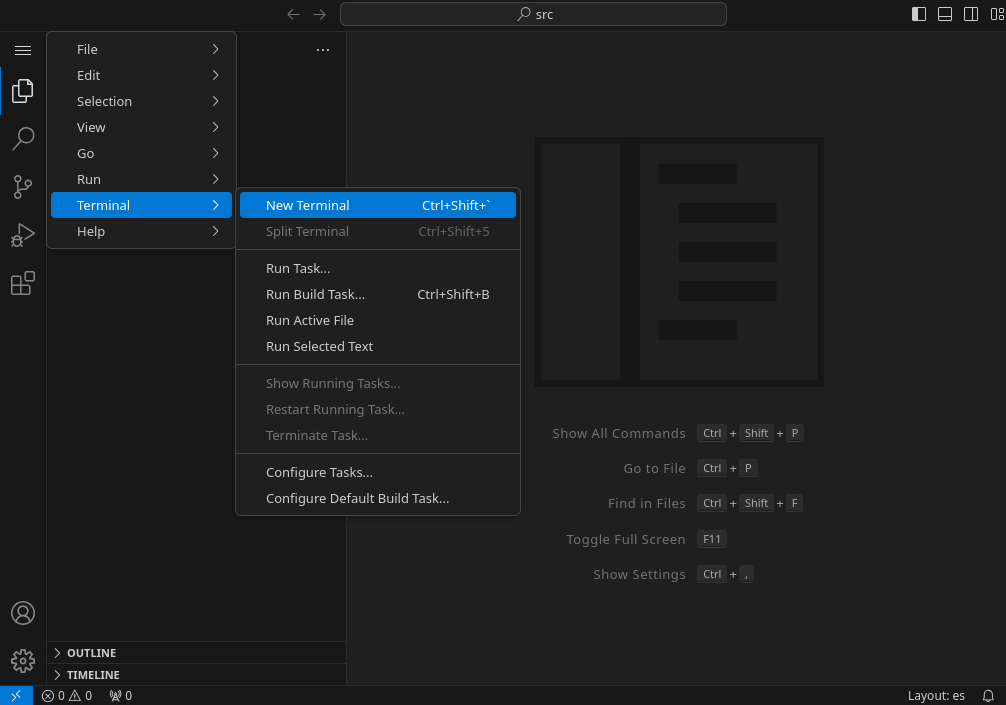
4- From the menu (three horizontal lines, top-left), select Terminal > New Terminal.
5- Clone the Repository: Use the terminal to clone your GitHub repository:
git clone http://gitea.apps.CLUSTER_DOMAIN/USERNAME/ai.git6- Set Up the Pipeline Script: Create a new file hardhat-kubeflow-pipeline.py in the cloned directory (right-click to create a file). Copy the example script from: hardhat-kubeflow-pipeline.py. Save it and prepare for review.
Next, we’ll review the script’s implementation to understand the pipeline’s logic and adapt it to our needs.
Let’s review the hardhat-kubeflow-pipeline.py script.
The script defines the pipeline structure, specifying the order in which pipeline components are executed. It also includes the input variable definitions and the Kubernetes resources allocated to each task. Similar to the Elyra pipeline, the steps are distinct, meaning that if variables or files are required from one step in another, they must be explicitly 'passed' between them. Kubeflow simplifies this process by offering tools to manage data handling between tasks (there is also a feature to pass ML artifacts that is not used in this workshop), allowing you to easily define input and output variables for seamless step-to-step communication. Additionally, Kubeflow provides straightforward mechanisms for creating and attaching Kubernetes Persistent Volumes, enabling file sharing between tasks. For instance, the dataset downloaded by the initial task can be stored on a volume and subsequently accessed by the training task without manual intervention.
Here is an excerpt from the script containing the pipeline definition:
# Define the pipeline
@dsl.pipeline(
    name='YOLO Training Pipeline',
    description='Pipeline to download data, train YOLO model, and upload results to OpenShift Data Foundation'
)
def yolo_training_pipeline(

    roboflow_api_key: str,
    roboflow_workspace: str,
    roboflow_project: str,
    roboflow_version: int,

    workshop_username: str,
    container_registry: str,

    object_storage_bucket: str,
    object_access_key: str,
    object_secret_key: str,
    object_storage_endpoint: str = "s3.openshift-storage.svc:443",

    train_name: str = "hardhat",
    train_yolo_model: str = "yolo11m.pt",
    train_optimizer: str = "SGD",
    train_learning_rate: float = 0.005,
    train_epochs: int = 50,
    train_batch_size: int = 16,
    train_img_size: int = 640,

    container_registry_secret_name: str = "quay-local-push-secret",

    model_registry_name: str = "object-detection-model-registry"
):

    # Create PV
    pvc = kubernetes.CreatePVC(
        pvc_name_suffix="-kubeflow-pvc",
        access_modes=['ReadWriteOnce'],
        size="5Gi",
        storage_class_name="ocs-storagecluster-ceph-rbd",
    )
    pvc_shm = kubernetes.CreatePVC(
        pvc_name_suffix="shm",
        access_modes=['ReadWriteOnce'],
        size="1Gi",
        storage_class_name="ocs-storagecluster-ceph-rbd",
    )


    # Download dataset
    download_task = download_dataset(
        api_key=roboflow_api_key,
        workspace=roboflow_workspace,
        project=roboflow_project,
        version=roboflow_version
    )
    download_task.set_caching_options(enable_caching=False)
    download_task.set_accelerator_limit(1)
    download_task.set_accelerator_type("nvidia.com/gpu")
    download_task.add_node_selector_constraint("nvidia.com/gpu")

    kubernetes.mount_pvc(
        download_task,
        pvc_name=pvc.outputs['name'],
        mount_path='/opt/app-root/src',
    )
    kubernetes.add_toleration(
        download_task,
        key="nvidia.com/gpu",
        operator="Equal",
        value="True",
        effect="NoSchedule"
    )


    # Train model
    train_task = train_model(
        dataset_path=download_task.output,
        epochs=train_epochs,
        batch_size=train_batch_size,
        img_size=train_img_size,
        name=train_name,
        optimizer=train_optimizer,
        learning_rate=train_learning_rate,
        yolo_model=train_yolo_model
    ).after(download_task)
    train_task.set_accelerator_limit(1)
    train_task.set_accelerator_type("nvidia.com/gpu")
    train_task.add_node_selector_constraint("nvidia.com/gpu")
    train_task.set_memory_request('2Gi')
    train_task.set_caching_options(enable_caching=False)
    kubernetes.mount_pvc(
        train_task,
        pvc_name=pvc.outputs['name'],
        mount_path='/opt/app-root/src',
    )
    kubernetes.mount_pvc(
        train_task,
        pvc_name=pvc_shm.outputs['name'],
        mount_path='/dev/shm',
    )
    kubernetes.add_toleration(
        train_task,
        key="nvidia.com/gpu",
        operator="Equal",
        value="True",
        effect="NoSchedule"
    )


    # Upload results
    upload_task = upload_to_storage(
        train_dir=train_task.outputs['train_dir'],
        test_dir=train_task.outputs['test_dir'],
        endpoint=object_storage_endpoint,
        access_key=object_access_key,
        secret_key=object_secret_key,
        bucket=object_storage_bucket,
        outputdims=train_task.outputs['inference_outputdims']
    ).after(train_task)
    upload_task.set_caching_options(enable_caching=False)
    kubernetes.mount_pvc(
        upload_task,
        pvc_name=pvc.outputs['name'],
        mount_path='/opt/app-root/src',
    )
    kubernetes.add_toleration(
        upload_task,
        key="nvidia.com/gpu",
        operator="Equal",
        value="True",
        effect="NoSchedule"
    )
    delete_pvc = kubernetes.DeletePVC(
        pvc_name=pvc.outputs['name']
    ).after(upload_task)

    delete_pvc_shm = kubernetes.DeletePVC(
        pvc_name=pvc_shm.outputs['name']
    ).after(train_task)


    # Create ModelCar

    modelcar_task = create_modelcar(
        pipeline_name="ai-modelcar" ,

        user_name=workshop_username,

        object_storage_endpoint=object_storage_endpoint,
        object_storage_bucket=object_storage_bucket,
        object_storage_access_key=object_access_key,
        object_storage_secret_key=object_secret_key,
        object_storage_path=upload_task.outputs['model_artifact_s3_path'],

        container_registry_credentials=container_registry_secret_name,
        container_registry=container_registry,
        modelcar_image_name=train_name,
        modelcar_image_tag=upload_task.outputs['tag'],

    ).after(upload_task)
    modelcar_task.set_caching_options(enable_caching=False)


    # Push to model registry
    push_to_model_registry(
        user_name=workshop_username,
        model_name=train_name,
        model_format_name="ONNX" ,
        metrics=train_task.outputs['metrics'],
        model_registry_name=model_registry_name,
        output_dims=train_task.outputs['inference_outputdims'],
        container_registry=container_registry,
        modelcar_image_name=train_name,
        modelcar_image_tag=upload_task.outputs['tag'],

        roboflow_workspace=roboflow_workspace,
        roboflow_project=roboflow_project,
        roboflow_version=roboflow_version,
        train_epochs=train_epochs,
        train_batch_size=train_batch_size,
        train_img_size=train_img_size
    ).after(modelcar_task)
As an example that you can also use OpenShift internal services as endpoints, here we fixed the OpenShift Data Foundation endpoint to s3.openshift-storage.svc
|
Besides the Pipeline definition, the hardhat-kubeflow-pipeline.py script also contains the step (components) definitions.
| For production pipelines it is better to configure Kubernetes Secrets and import the sensitive information from them instead of passing them as clear text in the pipeline inputs. |
Download data step
The first step is to download the Dataset. This task has a Persistent Volume attached where it will store the Dataset contents. It will use the Roboflow libraries and the provided input variables to download the files directly from Roboflow, as it was done during the Model Development section.
Let’s review the task definition:
# Component 1: Download Dataset
@dsl.component(
    base_image="quay.io/luisarizmendi/pytorch-custom:latest",
    packages_to_install=["roboflow", "pyyaml"]
)
def download_dataset(
    api_key: str,
    workspace: str,
    project: str,
    version: int,
    dataset_path: dsl.OutputPath(str)
) -> None:
    from roboflow import Roboflow
    import yaml
    import os

    rf = Roboflow(api_key=api_key)
    project = rf.workspace(workspace).project(project)
    version = project.version(version)
    dataset = version.download("yolov11")

    # Update data.yaml paths
    dataset_yaml_path = f"{dataset.location}/data.yaml"
    with open(dataset_yaml_path, "r") as file:
        data_config = yaml.safe_load(file)

    data_config["train"] = f"{dataset.location}/train/images"
    data_config["val"] = f"{dataset.location}/valid/images"
    data_config["test"] = f"{dataset.location}/test/images"

    print(dataset)

    with open(dataset_path, "w") as f:
        f.write(dataset.location)
An important aspect to highlight is that each step in the pipeline specifies the base container image to be used. In this case, the custom image quay.io/luisarizmendi/pytorch-custom:latest is utilized. This image includes all the necessary dependencies, eliminating the need to download and install packages every time the task runs. Additionally, the task definitions include examples of how to install additional packages if needed. However, these package installations won’t be executed in this setup, as all required packages are already pre-installed within the custom image, ensuring efficiency and consistency.
Not much to highlight here, aside what is already explain. We’ll dive into the toleration settings and the reason for configuring accelerator cards in the next section (spoiler: it’s tied to Kubeflow’s capabilities and how the Kubernetes scheduler optimizes resource allocation).
Training step
After downloading the dataset, the pipeline moves on to the model training task. This task utilizes the same Persistent Volume as the previous step, ensuring seamless access to the dataset files. During this phase, the provided inputs are used to configure the training hyperparameters.
One significant enhancement in this Kubeflow step, compared to the Elyra pipelines, is the calculation of metrics during training. These metrics are stored in a variable and will later be used to populate the metadata in the Model Registry, adding an extra layer of insight and traceability to the model lifecycle.
# Component 2: Train Model
@dsl.component(
    base_image="quay.io/luisarizmendi/pytorch-custom:latest",
    packages_to_install=["ultralytics", "torch", "pandas"]
)
def train_model(
    dataset_path: str,
    epochs: int = 50,
    batch_size: int = 16,
    img_size: int = 640,
    name: str = "yolo",
    yolo_model: str = "yolo11m.pt",
    optimizer: str = "SGD",
    learning_rate: float = 0.005,
) -> NamedTuple('Outputs', [
    ('train_dir', str),
    ('test_dir', str),
    ('metrics', dict),
    ('inference_outputdims', str)
]):
    import torch
    from ultralytics import YOLO
    import pandas as pd
    import os
    import onnx

    device = torch.device("cuda:0" if torch.cuda.is_available() else "cpu")
    print(f"Using device: {device}")

    CONFIG = {
        'name': name,
        'model': yolo_model,
        'data': f"{dataset_path}/data.yaml",
        'epochs': epochs,
        'batch': batch_size,
        'imgsz': img_size,
        'device': device,
        'optimizer': optimizer,
        'lr0': 0.001,
        'lrf': learning_rate,
        'momentum': 0.9,
        'weight_decay': 0.0005,
        'warmup_epochs': 3,
        'warmup_bias_lr': 0.01,
        'warmup_momentum': 0.8,
        'amp': False,
    }

    # Configure PyTorch
    os.environ["PYTORCH_CUDA_ALLOC_CONF"] = "expandable_segments:True"

    # Initialize and train model
    model = YOLO(CONFIG['model'])
    results_train = model.train(
        name=CONFIG['name'],
        data=CONFIG['data'],
        epochs=CONFIG['epochs'],
        batch=CONFIG['batch'],
        imgsz=CONFIG['imgsz'],
        device=CONFIG['device'],

        # Optimizer parameters
        optimizer=CONFIG['optimizer'],
        lr0=CONFIG['lr0'],
        lrf=CONFIG['lrf'],
        momentum=CONFIG['momentum'],
        weight_decay=CONFIG['weight_decay'],
        warmup_epochs=CONFIG['warmup_epochs'],
        warmup_bias_lr=CONFIG['warmup_bias_lr'],
        warmup_momentum=CONFIG['warmup_momentum'],
        amp=CONFIG['amp'],
    )

    # Evaluate model
    results_test = model.val(
        data=CONFIG['data'],
        split='test',
        device=CONFIG['device'],
        imgsz=CONFIG['imgsz']
    )

    # Export to ONNX format
    export_path = model.export(format='onnx')
    onnx_model = onnx.load(export_path)
    output_tensor = onnx_model.graph.output[0]
    inference_outputdims = [
        d.dim_value if (d.dim_value > 0) else -1
        for d in output_tensor.type.tensor_type.shape.dim
    ]
    print("Exported model output shape:", inference_outputdims)

    # Compute metrics from CSV
    results_csv_path = os.path.join(results_train.save_dir, "results.csv")
    results_df = pd.read_csv(results_csv_path)

    # Extract metrics
    metrics = {
        "precision": results_df["metrics/precision(B)"].iloc[-1],
        "recall": results_df["metrics/recall(B)"].iloc[-1],
        "mAP50": results_df["metrics/mAP50(B)"].iloc[-1],
        "mAP50-95": results_df["metrics/mAP50-95(B)"].iloc[-1]
    }

    return NamedTuple('Outputs', [
        ('train_dir', str),
        ('test_dir', str),
        ('metrics', dict),
        ('inference_outputdims', str)
    ])(
        train_dir=str(results_train.save_dir),
        test_dir=str(results_test.save_dir),
        metrics=metrics,
        inference_outputdims=str(inference_outputdims)
    )
The training step also shares the Persistent Volume with the next step, as the trained model needs to be uploaded to Object Storage. Since each training iteration may result in a different name and file path, the training name is passed as an input variable. This allows dynamic calculation of the model paths and the performance result files.
The train step has an additional Persistent Volumen mounted to extend the POD’s Shared Memory. This is needed when you run the inference using GPUs. Kubeflow v2 already implemented the method to use EmptyDir instead but the current version of the OpenShift AI pipelines does not have this path yet, so a Persistent Volume is used instead.
There is another important consideration when working with GPUs: the Kubernetes scheduling.
When working with GPUs in Kubeflow Pipelines, one crucial aspect to consider is Kubernetes scheduling. By default, Kubeflow does not interact with the Kubernetes Scheduler to optimize task placement across nodes from a global perspective. Instead, it makes scheduling decisions on a per-task basis. This means that each task is scheduled independently, without considering how previous or future tasks are placed.
While this behavior is not inherently problematic, it can lead to issues when dealing with shared resources, for example, a Persistent Volume (PV) shared across multiple tasks like in our case. This challenge becomes even more pronounced in environments with multiple deployment zones, where Kubernetes may inadvertently schedule a pod in a zone where it cannot access the shared resource. The issue is particularly critical when there are only a few nodes per zone, as is often the case in workshop environments like this one.
Consider an OpenShift cluster deployed across three zones in a public cloud (us-east-a, us-east-b, us-east-c). In this scenario, the cloud provider does not allow sharing Persistent Volumes across zones, meaning that all pods needing a specific PV must be scheduled in the same zone.
Let’s walk through what happens when running a Kubeflow Pipeline:
The Download Dataset Task does not require GPUs. Kubernetes schedules the corresponding pod in us-east-a, where resources are available. The pod is deployed, downloads the dataset, and stores it in the Persistent Volume.
The Training Task requires GPUs. Kubernetes tries to schedule the pod in us-east-a because the Persistent Volume is bound to that zone. However, if no GPU-enabled nodes exist in us-east-a, or if they are fully occupied, the scheduler fails.
This issue arises because Kubernetes prioritizes Persistent Volume placement over GPU availability, potentially leading to a scheduling failure when GPUs are needed.
How can be that solved? We use the set_accelerator_limit, set_accelerator_type and add_node_selector_constraint as the methods that make the kubernetes scheduler take into account the GPU selection when selecting the node where the task will be running. Although not ideal, there is a workaround to solve this issue with you have multiple zones and few nodes in each zone, scheduling all tasks (in our example the Download and the Training task) taking into account all the resources that will be needed globally, so in this case we should use the GPUs to know where to locate the "Download" task eventhough it does not use any GPU at all. That will give us consistency and avoid having scheduling failures in environments with few nodes per zone.
The main drawback of this workaround is that non-GPU workloads will be scheduled on GPU nodes, potentially leading to inefficient resource utilization. A better long-term solution is to remove the shared Persistent Volume dependency by uploading data to Object Storage instead. However, for simplicity in this workshop, we will proceed with the Persistent Volume approach while implementing the scheduling workaround.
Also bear in mind that other schudule configurations need to be also consistent, for example when having Kubernetes taints in the Kubernetes nodes to prevent any workload run on GPU nodes, you will need to configure "tolerations" in your pipeline tasks. It’s crucial to ensure that these configurations are consistently applied across all tasks that share a Persistent Volume (although GPUs will be only used during Training task). If these configurations are not uniform, there is a risk that the scheduler may attempt to deploy a pod for one of the tasks in a zone where the shared volume is not available.
Upload results step
The trained model native PyTorch .pt is uploaded to the bucket specified by the input variable, stored in the /model/pytorch directory. It’s important to consider that certain model serving solutions may require a specific directory structure and/or additional configuration files. For instance, OpenVINO serving with the onnx-1 format expects the directory structure to be <version>/<model_name>.onnx (and you can add a config.pbtxt file), while NVIDIA Triton for torchscript expects the format <version>/model.pt.
# Component 3: Upload to Object Storage
@dsl.component(
    base_image="quay.io/luisarizmendi/pytorch-custom:latest",
)
def upload_to_storage(
    train_dir: str,
    test_dir: str,
    endpoint: str,
    access_key: str,
    secret_key: str,
    bucket: str,
    outputdims: str,
    model_path: dsl.OutputPath(str)
) -> NamedTuple('Outputs', [
    ('model_artifact_s3_path', str),
    ('files_model', str),
    ('tag', str)
]):
    import boto3
    from botocore.exceptions import NoCredentialsError, PartialCredentialsError
    import os
    from datetime import datetime

    tag=datetime.now().strftime("%m-%d-%H_%M")

    s3_client = boto3.client(
        "s3",
        endpoint_url=f"https://{endpoint}",
        aws_access_key_id=access_key,
        aws_secret_access_key=secret_key,
        verify=False
    )

    # Get paths for files
    weights_path = os.path.join(train_dir, "weights")

    files_train = [os.path.join(train_dir, f) for f in os.listdir(train_dir)
                   if os.path.isfile(os.path.join(train_dir, f))]
    files_models = [os.path.join(weights_path, f) for f in os.listdir(weights_path)
                    if os.path.isfile(os.path.join(weights_path, f))]

    files_model = os.path.join(train_dir, "weights") + "/best"

    files_test = [os.path.join(test_dir, f) for f in os.listdir(test_dir)
                  if os.path.isfile(os.path.join(test_dir, f))]

    directory_name = os.path.basename(train_dir) + "-" + tag

    # Upload files
    for file_path in files_train:
        try:
            s3_client.upload_file(file_path, bucket, f"{directory_name}/metrics/train-val/{os.path.basename(file_path)}")
        except Exception as e:
            print(f"Error uploading {file_path}: {e}")

    for file_path in files_test:
        try:
            s3_client.upload_file(file_path, bucket, f"{directory_name}/metrics/test/{os.path.basename(file_path)}")
        except Exception as e:
            print(f"Error uploading {file_path}: {e}")

    with open(model_path, "w") as f:
        f.write(directory_name)

    try:
        s3_client.upload_file(f"{files_model}.pt", bucket, f"{directory_name}/{os.path.basename(files_model)}.pt")
    except Exception as e:
        print(f"Error uploading {files_model}.pt: {e}")

    try:
        s3_client.upload_file(f"{files_model}.onnx", bucket, f"{directory_name}/serving/hardhat/1/model.onnx")
    except Exception as e:
        print(f"Error uploading {files_model}.onnx: {e}")

    try:
        # Create the config.pbtxt file
        config_pbtxt = f"""\
name: "hardhat"
platform: "onnxruntime_onnx"
max_batch_size: 0
input [
{{
    name: "images"
    data_type: TYPE_FP32
    dims: [-1, 3, 640, 640]
}}
]
output [
{{
    name: "output0"
    data_type: TYPE_FP32
    dims: {outputdims}
}}
]
backend: "onnxruntime"
"""

        with open("config.pbtxt", "w") as f:
            f.write(config_pbtxt)

        s3_client.upload_file("config.pbtxt", bucket, f"{directory_name}/serving/hardhat/config.pbtxt")
    except Exception as e:
        print(f"Error uploading config.pbtxt: {e}")

    model_artifact_s3_path = directory_name

    return NamedTuple('Outputs', [
        ('model_artifact_s3_path', str),
        ('files_model', str),
        ('tag', str)
    ])(
        model_artifact_s3_path,
        os.path.basename(files_model),
        tag
    )
Modelcar step
In this step, we introduce a new concept: the model distribution mechanism. We’ll take a moment to explain what it is, why it’s important, and how it plays a crucial role in Edge Computing use cases
AI models that are typically trained in a core data center or cloud environment. The model, which is usually stored as a file (such as .pth, .onnx, or .tflite), contains the learned parameters and architecture. After training, the model is packaged and made ready for deployment to edge devices.
The model is then distributed to the edge through an inference server, which is a lightweight application that loads the model and performs real-time inference. The inference server is optimized for edge environments, where computational resources are limited. It can handle requests from edge devices, such as sensors or cameras, running the model locally to generate predictions without needing to send data back to the central data center.
AI deployment at the edge requires careful consideration of model distribution strategies. The architectural choices made when deploying machine learning models to edge devices significantly impact performance, maintainability, and operational flexibility. There are several approaches to distributing models to edge environments, each with distinct characteristics and tradeoffs that must be evaluated against specific use case requirements and operational constraints.
The packaging and deployment strategy for inference components directly influences resource utilization, update mechanisms, and system dependencies. Let’s review some of these distribution patterns that have emerged as common implementation strategies, each offering unique advantages for different deployment scenarios and infrastructure environments.
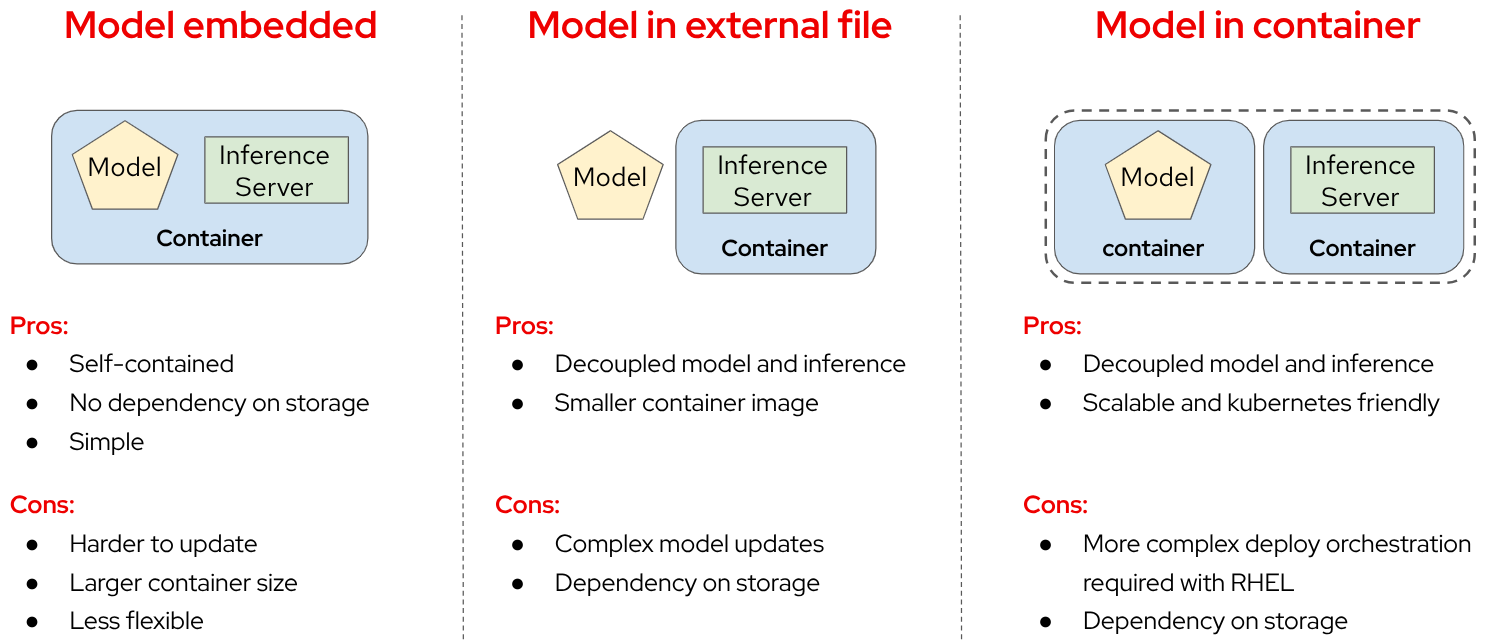
-
Model Embedded in Container: In this approach, the model and inference server are packaged together in a single container image. This creates a self-contained deployment unit that doesn’t require external dependencies for storage or model loading. The simplicity of this approach makes it particularly suitable for edge environments with limited infrastructure. However, this integration comes with notable drawbacks. The container size increases significantly due to the embedded model, potentially causing deployment challenges in bandwidth-constrained environments. Additionally, model updates require rebuilding and redeploying the entire container, which can be cumbersome for iterative development cycles. This approach offers less flexibility for model swapping or runtime optimization compared to decoupled alternatives.
-
Model as External File: When distributing the model as an external file separate from the inference server container, you achieve a more modular architecture. This decoupling allows for independent updates of either component without affecting the other. The inference server container becomes significantly smaller, reducing deployment times and resource utilization. However, this approach introduces a dependency on external storage systems, which may complicate deployment in isolated edge environments. Model updates, while more straightforward than the embedded approach, still require careful coordination with the inference server to ensure compatibility and proper loading. This approach necessitates configuring the inference server to locate and load the external model file correctly, which adds complexity to the deployment process.
-
Model in Separate Container: The third approach involves packaging the model and inference server in separate containers but deploying them together as a cohesive unit. This method provides enhanced decoupling while maintaining deployment coordination. Using techniques like init-containers to extract the model from its container before the inference server starts creates a Kubernetes-friendly architecture that aligns well with modern orchestration practices. This approach offers excellent scalability options, as you can independently scale the inference components based on workload demands. However, it requires more sophisticated deployment orchestration, especially when implemented with Red Hat Enterprise Linux (RHEL) or in non-Kubernetes environments like Podman. While this approach resembles KServe’s ModelMesh pattern, it can be adapted for various deployment platforms beyond Kubernetes with appropriate configuration.
In this workshop we will use separate container images to distribute our model.
As we will see, this is one of the available options to perform the model serving with KServe, the open-source model serving framework designed for Kubernetes used in OpenShift AI. It provides a scalable and standardized way to deploy and manage machine learning (ML) models in production and it is the method used by OpenShift AI to perform the model serving (explained in the next workshop module).
More specifically, the Kserve feature is named Modelcar, and that’s why you will find that name in the pipeline and other parts of this workshop.
This Kubeflow pipeline task triggers an OpenShift Pipeline, an automated CI/CD workflow powered by Tekton, which runs containerized tasks in Kubernetes. OpenShift Pipelines is designed for CI/CD automation (build, test, deploy), while OpenShift AI Kubeflow Pipelines is tailored for ML workflows (train, experiment, deploy models).
The OpenShift pipeline will perform the following actions: it fetches the required files, builds a container image, and pushes the new image to the registry.
# Component 4: Trigger Tekton PipelineRun
@dsl.component(
    base_image='python:3.9',
    packages_to_install=['kubernetes']
)


def create_modelcar(
        pipeline_name: str,

        user_name: str,

        object_storage_endpoint: str,
        object_storage_bucket: str,
        object_storage_path: str,
        object_storage_access_key: str,
        object_storage_secret_key: str,

        modelcar_image_name: str,
        modelcar_image_tag: str,

        container_registry_credentials: str,
        container_registry: str,

) -> str:

    from kubernetes import client, config
    import time
    import random
    import string
    import re

    pipeline_run_name=f"modelcar-run-{modelcar_image_tag}"
    modelcar_image_name=f"modelcar-{modelcar_image_name}"

    # Underscores  are not allowed in k8s names
    pipeline_run_name = pipeline_run_name.replace("_", "-")
    random_str = ''.join(random.choices(string.ascii_lowercase + string.digits, k=3))
    pipeline_run_name += f"-{random_str}"

    container_registry_clean = re.sub(r"^https?://([^/]+).*", r"\1", container_registry)
    print(f"Using this Container Registry: {container_registry_clean}")

    config.load_incluster_config()
    custom_api = client.CustomObjectsApi()

    pipeline_run_manifest = {
        "apiVersion": "tekton.dev/v1",
        "kind": "PipelineRun",
        "metadata": {
            "name": pipeline_run_name,
            "namespace": f"{user_name}-tools"
        },
        "spec": {
            "params": [
                {
                    "name": "object-api-url",
                    "value": object_storage_endpoint
                },
                {
                    "name": "username",
                    "value": user_name
                },
                {
                    "name": "object_access_key",
                    "value": object_storage_access_key
                },
                {
                    "name": "object_secret_key",
                    "value": object_storage_secret_key
                },
                {
                    "name": "object-bucket",
                    "value": object_storage_bucket
                },
                {
                    "name": "object-directory-path",
                    "value": f"{object_storage_path}/serving"
                },
                {
                    "name": "modelcar-image-name",
                    "value": modelcar_image_name
                },
                {
                    "name": "container-registry",
                    "value": f"{container_registry_clean}/{user_name}"
                },
                {
                    "name": "quay-local-push-secret",
                    "value": container_registry_credentials
                },
                {
                    "name": "modelcar-image-tag",
                    "value": modelcar_image_tag
                }
            ],
            "pipelineRef": {
                "name": pipeline_name
            },
            "taskRunTemplate": {
                "serviceAccountName": "pipeline"
            },
            "timeouts": {
                "pipeline": "1h0m0s"
            },
            "workspaces": [
                {
                    "name": "shared-workspace",
                    "persistentVolumeClaim": {
                        "claimName": "ai-modelcar-pvc"
                    }
                },
                {
                    "name": "podman-credentials",
                    "secret": {
                        "secretName": container_registry_credentials
                    }
                }
            ]
        }
    }

    namespace_file_path = '/var/run/secrets/kubernetes.io/serviceaccount/namespace'
    with open(namespace_file_path, 'r') as namespace_file:
        namespace = namespace_file.read().strip()


    custom_api.create_namespaced_custom_object(
        group="tekton.dev",
        version="v1",
        namespace=f"{user_name}-tools",
        plural="pipelineruns",
        body=pipeline_run_manifest
    )
    print(f"Tekton PipelineRun '{pipeline_run_name}' triggered for pipeline '{pipeline_name}'.")

    time.sleep(5)

    # Poll
    timeout_seconds = 1800
    poll_interval = 10
    elapsed = 0

    while elapsed < timeout_seconds:
        time.sleep(poll_interval)
        elapsed += poll_interval

        run = custom_api.get_namespaced_custom_object(
            group="tekton.dev",
            version="v1",
            namespace=f"{user_name}-tools",
            plural="pipelineruns",
            name=pipeline_run_name
        )

        conditions = run.get("status", {}).get("conditions", [])
        if not conditions:
            continue

        condition = conditions[0]
        status = condition.get("status")
        reason = condition.get("reason")
        message = condition.get("message", "")

        if status == "True" and reason == "Succeeded":
            print(f"PipelineRun {pipeline_run_name} succeeded.")
            break
        elif status == "False":
            raise RuntimeError(f"PipelineRun {pipeline_run_name} failed: {reason} - {message}")

    else:
        raise TimeoutError(f"PipelineRun {pipeline_run_name} did not complete within timeout.")

    return pipeline_run_name
If you are curious about the OpenShift pipeline and associated tasks definition you can find the OpenShift Job that generates the YAMLs during the workshop deployment here.
Push to Registry step
The OpenShift AI Model Registry is a centralized repository for metadata storing, managing, and tracking machine learning models throughout their lifecycle. It allows you to add rich metadata to each model’s description, which can include performance metrics, hyperparameters, model version, and even the container image used for training. This metadata is invaluable for model versioning, auditing, and traceability, ensuring that all relevant information about the model’s origin and performance is easily accessible and well-documented for future use.
# Component 5: Push to Model Registry
@dsl.component(
    base_image='python:3.9',
    packages_to_install=['model-registry']
)
def push_to_model_registry(
    user_name: str,
    model_name: str,
    model_format_name: str,
    metrics: dict,
    model_registry_name: str,
    output_dims: str,
    container_registry: str,
    modelcar_image_name: str,
    modelcar_image_tag: str,

    roboflow_workspace: str,
    roboflow_project: str,
    roboflow_version: int,
    train_epochs: int,
    train_batch_size: int,
    train_img_size: int
):
    from model_registry import ModelRegistry
    from model_registry import utils
    import os
    import json
    import re

    container_registry_clean = re.sub(r"^https?://([^/]+).*", r"\1", container_registry)

    model_object_prefix = model_name if model_name else "model"

    # To avoid making the user introduce the cluster domain I get it from the Quay endpoint (that should be running in the same cluster). That's why in the vars I use the external endpoint for Quay
    cluster_domain= ""
    pattern = re.compile(r"apps\.([^/]+)")
    match = re.search(pattern, container_registry)
    cluster_domain = match.group(1) if match else None

    server_address = f"https://{model_registry_name}-rest.apps.{cluster_domain}"

    print(f"Publishing model into {server_address}")

    #namespace_file_path = '/var/run/secrets/kubernetes.io/serviceaccount/namespace'
    #with open(namespace_file_path, 'r') as namespace_file:
    #    namespace = namespace_file.read().strip()

    os.environ["KF_PIPELINES_SA_TOKEN_PATH"] = "/var/run/secrets/kubernetes.io/serviceaccount/token"

    def _register_model():
        registry = ModelRegistry(server_address=server_address, port=443, author=user_name, is_secure=False)
        registered_model_name = model_object_prefix
        metadata = {
            "Dataset": f"https://universe.roboflow.com/{roboflow_workspace}/{roboflow_project}/dataset/{str(roboflow_version)}",
            "Epochs": str(train_epochs),
            "Batch Size": str(train_batch_size),
            "Image Size": str(train_img_size),
            "mAP50": str(metrics["mAP50"]),
            "mAP50-95": str(metrics["mAP50-95"]),
            "precision": str(metrics["precision"]),
            "recall": str(metrics["recall"]),
            "output dims": str(output_dims)
        }

        rm = registry.register_model(
            registered_model_name,
            f"oci://{container_registry_clean}/{user_name}/modelcar-{modelcar_image_name}:{modelcar_image_tag}",
            version=modelcar_image_tag,
            description=f"{registered_model_name} is a dense neural network that detects Hardhats in images.",
            model_format_name=model_format_name,
            model_format_version="1",
            metadata=metadata
        )
        print("Model registered successfully")

    _register_model()
Pipeline Import

Before proceeding with the import, we need to convert the Python script into a YAML Kubeflow Pipeline definition (Intermediate Representation). Using the kfp library, we will execute the script to generate the YAML file required for importing the pipeline
Let’s generate the Pipeline YAML file and push it into Gitea.
1- Run the following commands in the Code terminal:
pip install --upgrade pip
pip install kfp[kubernetes]
cd ai
python hardhat-kubeflow-pipeline.py
2- You will generate a file named yolo_training_pipeline.yaml. Next, push the newly created files to Gitea. In the terminal window, run the following commands:
git config --global user.email USERNAME@acme.com
git config --global user.name USERNAME
git remote set-url origin http://USERNAME:PASSWORD@gitea.apps.CLUSTER_DOMAIN/USERNAME/ai.git
git add .
git commit -m "kubeflow Pipeline"
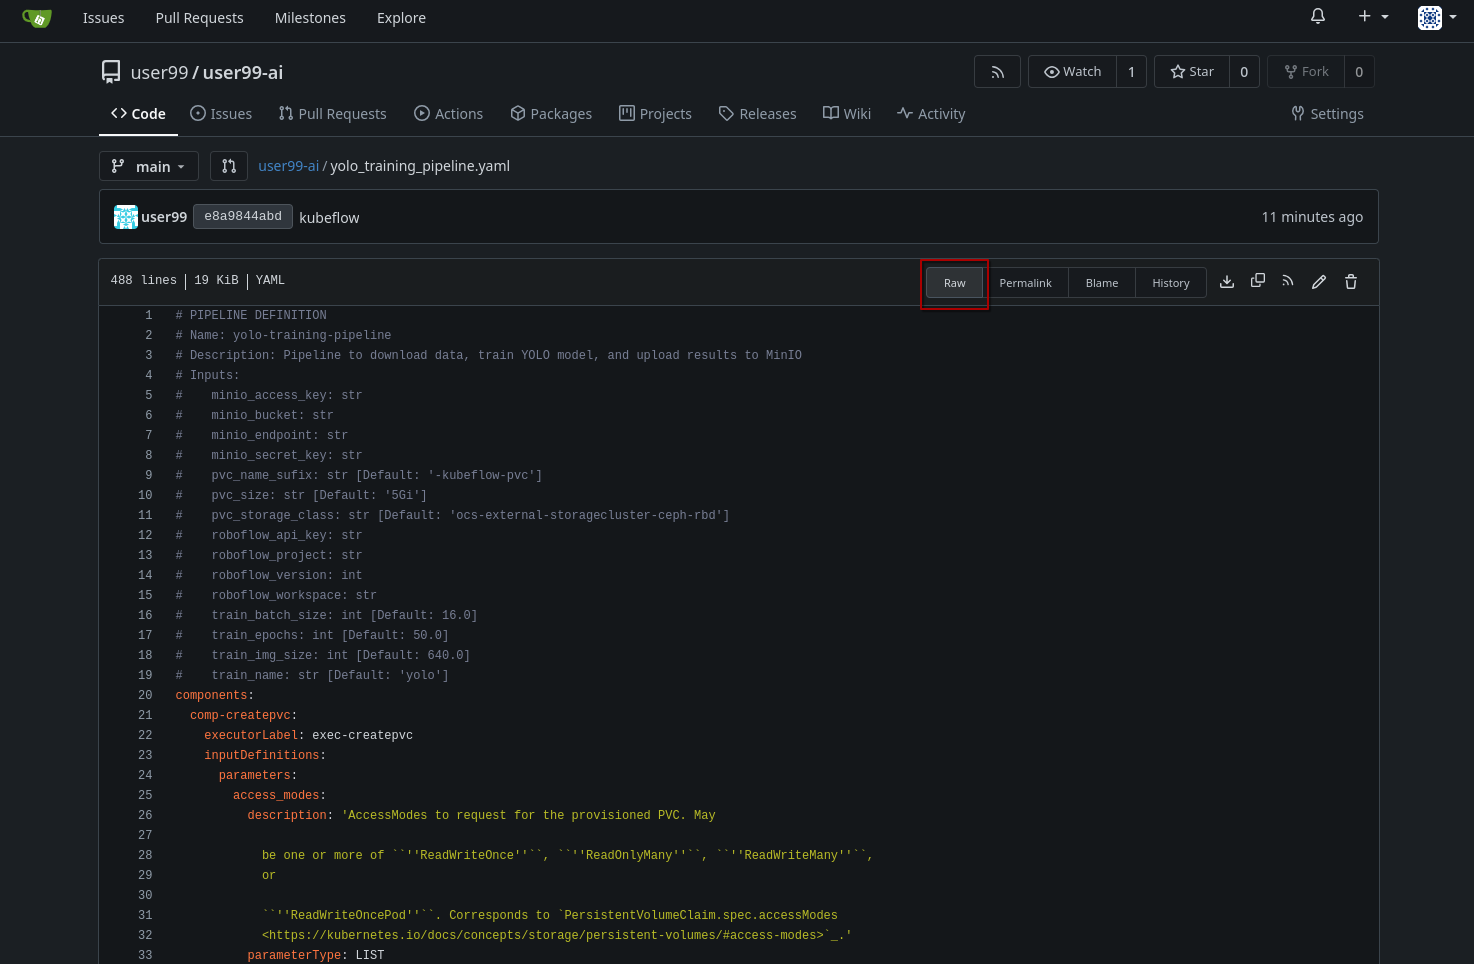
git push3- Now, navigate to Gitea at http://gitea.apps.CLUSTER_DOMAIN to confirm that your files have been successfully pushed. Open the yolo_training_pipeline.yaml file and select the Raw option from the top-right menu. Copy the URL of the raw file, as you will need it to import the pipeline.
|
If you don’t have GPUs or the GPUs are in use, you might want to import this other pipeline that does the training in the CPU: |
Once you have the YAML file available in Gitea, you can import it directly into OpenShift AI.
To proceed with the Kubeflow Pipeline import:
-
Go to "Data Science Pipelines > Pipelines"
-
Click Import Pipeline
-
Fill in Name (
hardhat-training) -
Select "Import by URL" and include the Gitea URL with the
yolo_training_pipeline.yamlraw content.

After the correct import, you will see the Pipeline diagram:

Once you have imported the pipeline you should stop the Code Wrokbench to save resources in the OpenShift cluster.
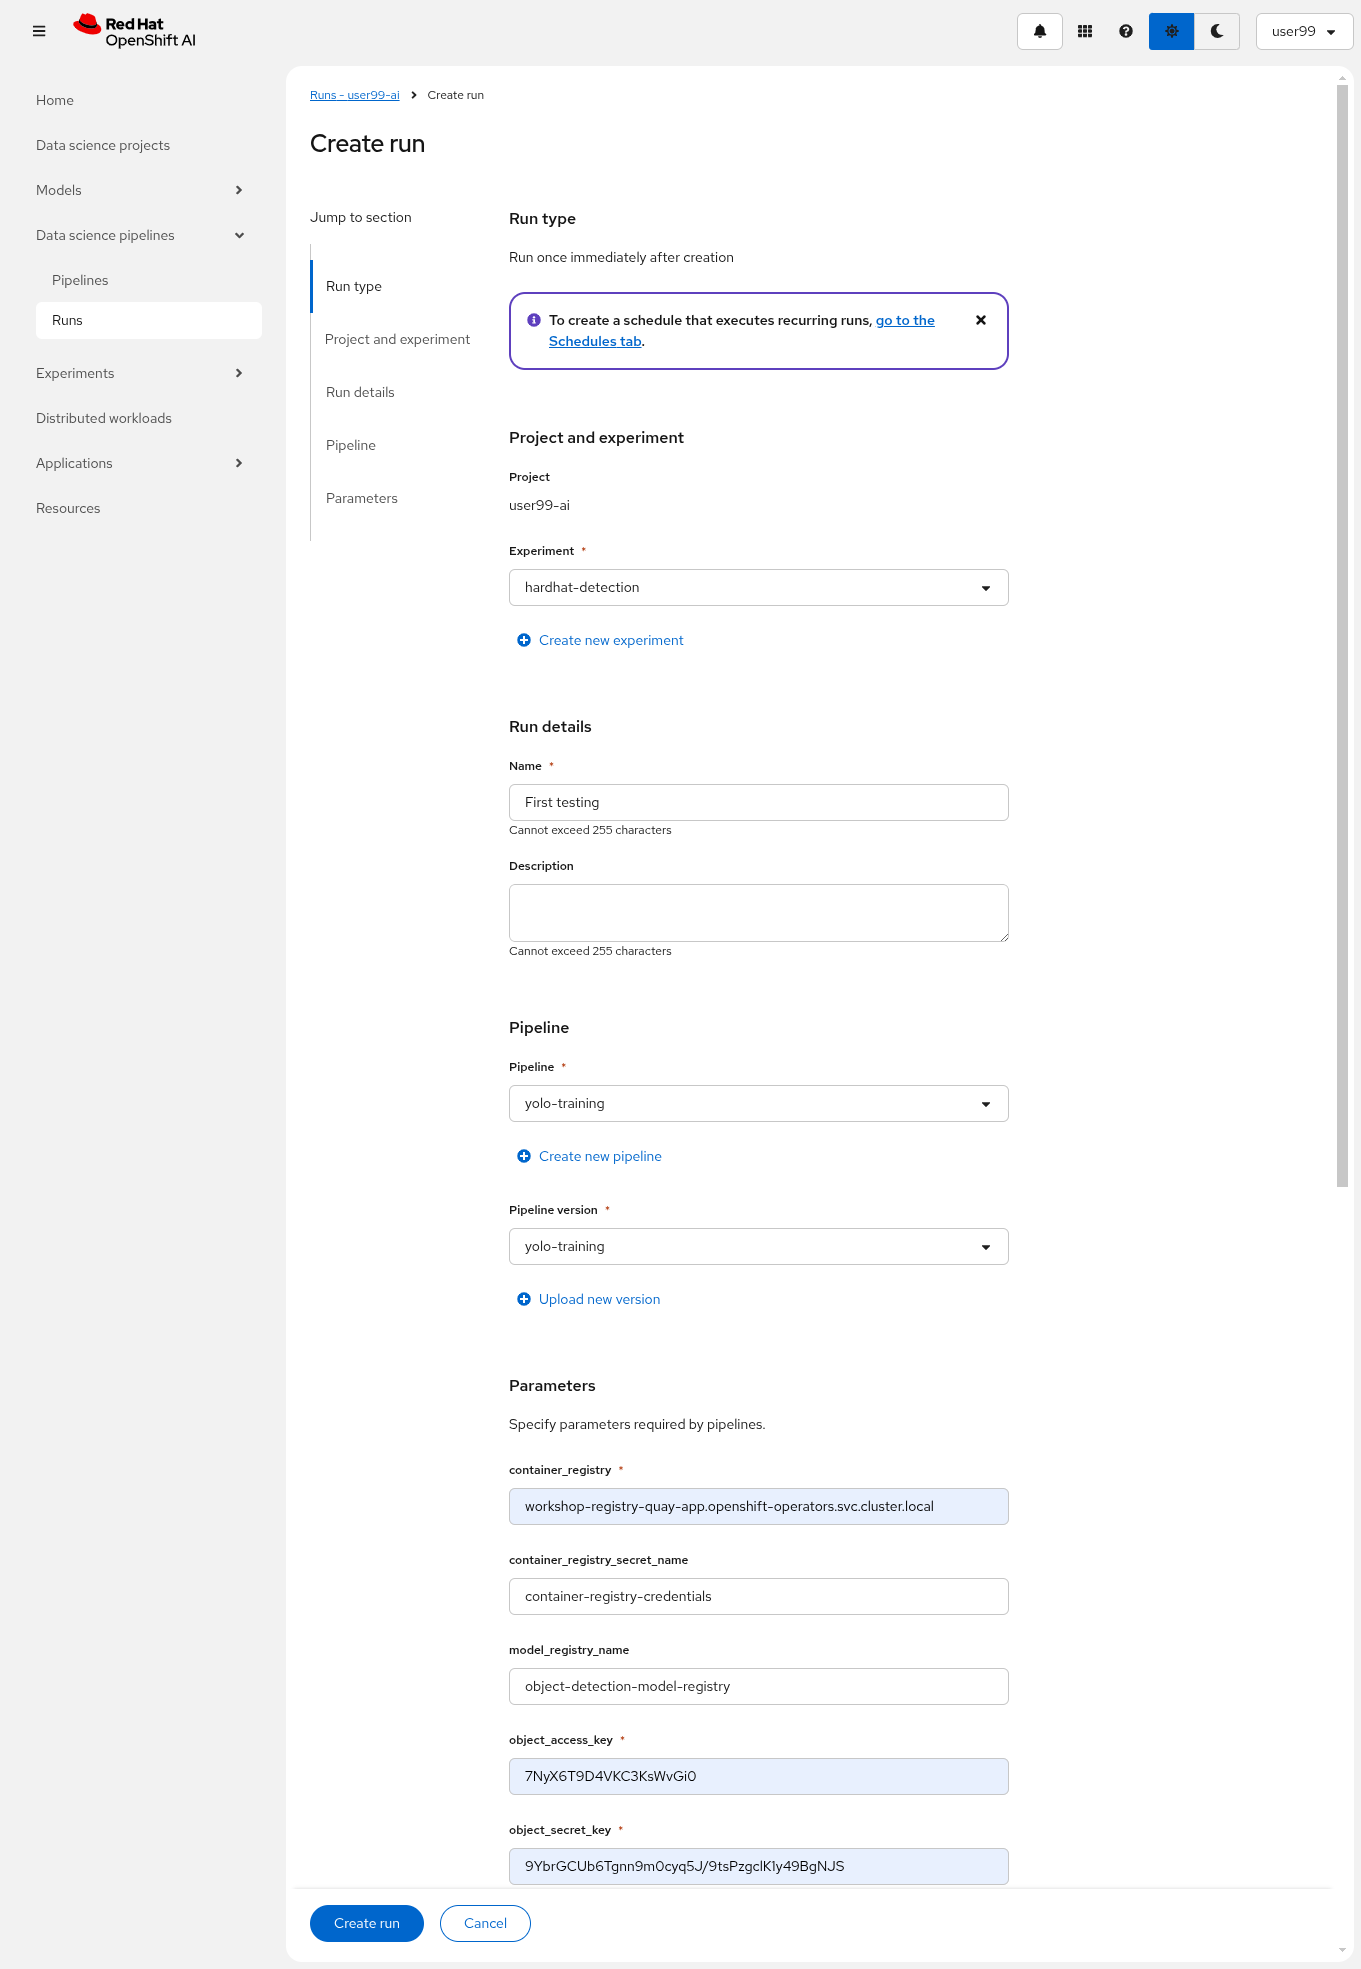
Pipeline Run

It’s time to run the imported Kubeflow Pipeline:
-
Click Actions and then
Create run -
Under the "Project and experiment" section, you might want to click "Create new experiment" (and name it
hardhat-detection) -
Give the run a name (e.g.
v1) -
Fill in the parameters that are empty:
-
container_registry:
https://workshop-registry-quay-openshift-operators.apps.CLUSTER_DOMAIN -
object_access_key:
OBJECT_STORAGE_MODELS_ACCESS_KEY -
object_secret_key:
OBJECT_STORAGE_MODELS_SECRET_KEY -
object_storage_bucket:
USERNAME-ai-models -
roboflow_api_key:
<your value> -
roboflow_project:
<your value> -
roboflow_workspace:
<your value> -
roboflow_version:
<your value> -
workshop_username:
USERNAME
-
-
Adjust the "Batch Size" and the "Epochs". If you are running a Mock Training you can configure them to "1" to speed-up the pipeline execution.
-
Batch Size:
<your value> -
Ephoch number:
<your value>
-
You might want to choose the xref:ai-specialist-01-data.adoc#_mock_training_dataset[Mock Training roboflow_project to save time running the pipeline during the workshop.
|
The first task (download-dataset) could take some time to finish if it’s the first run because it needs to pull the container image.
|
| Be careful not to copy any extra spaces in the names, as this will cause the download task to fail. |
| In contrast to Elyra Pipelines, this Kubeflow Pipeline automatically creates and deletes the Persistent Volume used for transferring files between pipeline tasks, ensuring efficient resource management and streamlined execution. |
| Keep in mind that if you’re short on time and can’t wait for a full model training process, you can opt for the so-called 'Mock Training' by using the reduced dataset you prepared during the Model Development section and configuring only one epoch. However, note that models trained on this dataset won’t be suitable for deployment, as they won’t achieve accurate object detection. Instead, you’ll need to use the provided pre-trained model during the Deployment section to ensure proper functionality. |
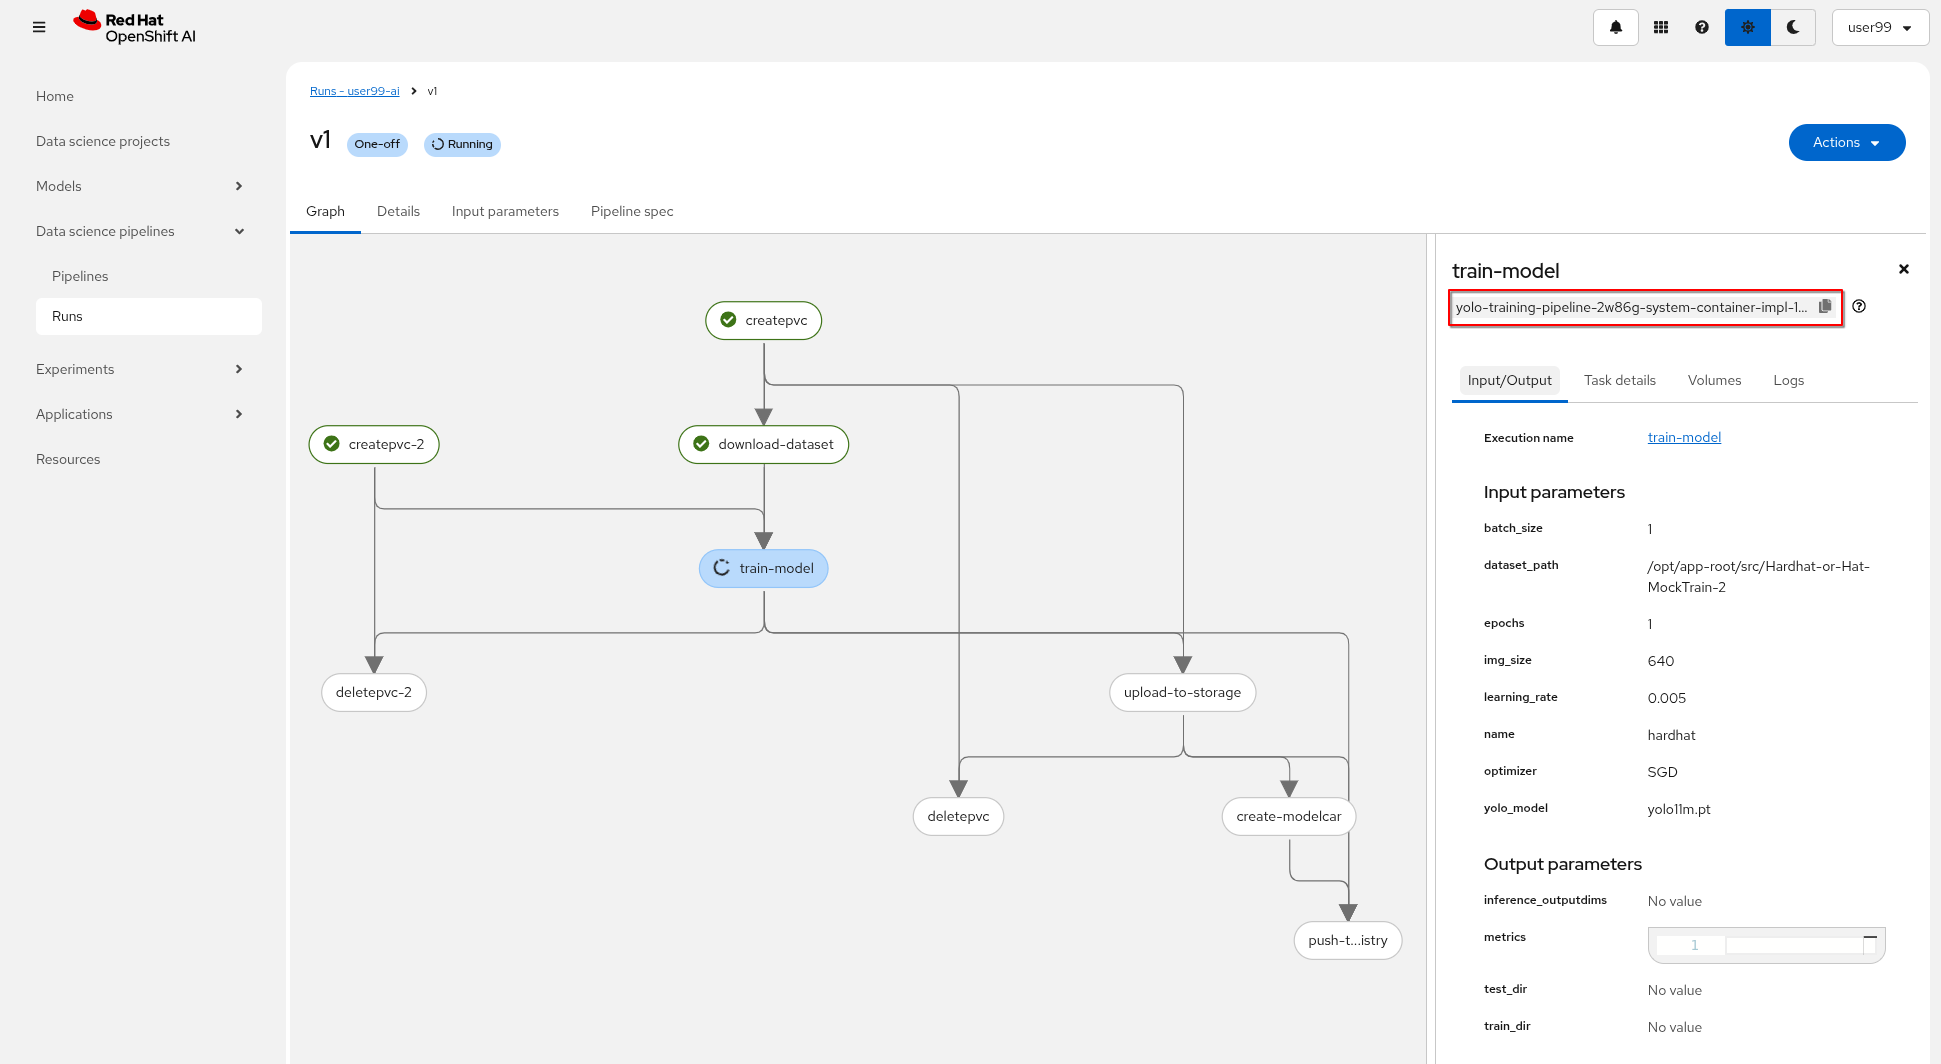
You can view the details of each task while it’s running to monitor important information. Additionally, you can check the POD name generated for the task (top right corner, in a red square in the image below), which is useful for accessing real-time logs in the OpenShift Console (since the Logs tab in the OpenShift AI Pipeline view is only available once the task has completed). You can also track the inputs and outputs associated with each task, which will be displayed once the task finishes, providing insight into the data flow and results at each stage of execution.
You can open the OpenShift Console and check how the Persistent Volume was created and bounded into the PODs that are used to run the Pipeline tasks or, if using GPUs, you could go to the OpenShift Console > Workloads > PODs, open the POD with that name (you can use the Filter box on the top of the list) for the training tasks and review the logs real time to double-check if a GPU or CPU is used during the training (you might need to check the "Show full log" box so see all the log).

If the Pipeline run POD is scheduled in a node where other workloads using GPUs are located, it could happen that your GPU run out of memory. If it happens try reducing the batch size or launch the run again after the other workloads finished or just import the Kubeflow Pipeline that only make use of CPU (just for testing propouses).

OpenShift Pipeline Run
When the Kubeflow Pipeline reaches the create-modelcar you can navigate to the "Pipelines" menu in the OpenShift Console. There you can see the OpenShift Pipeline execution:
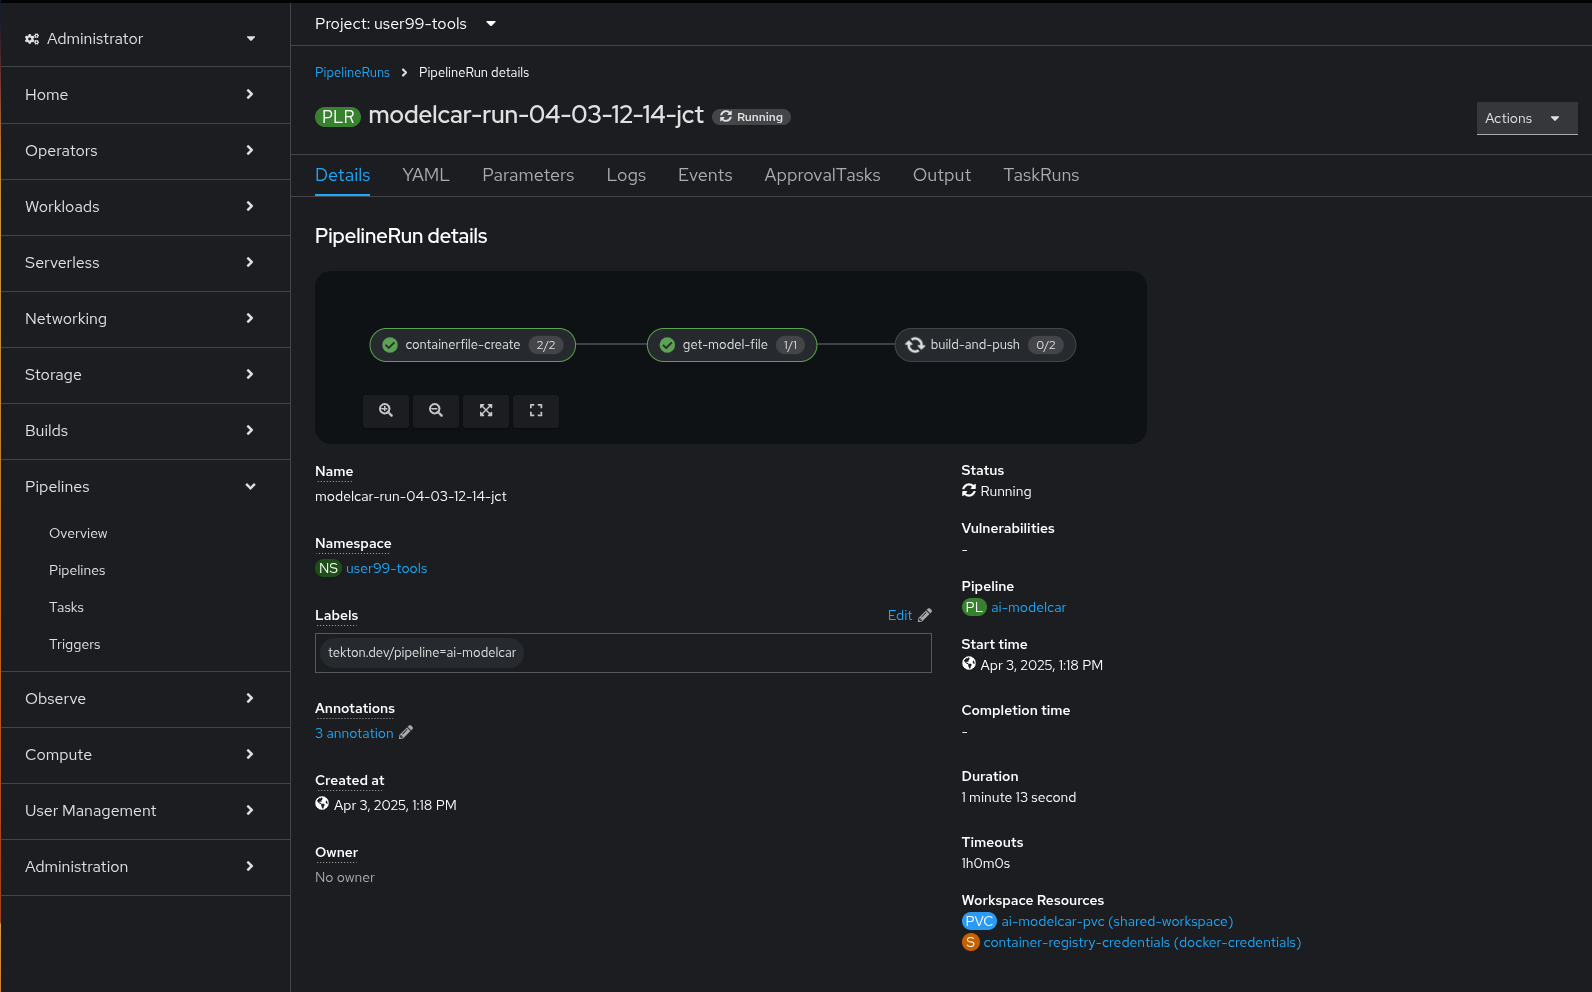
This OpenShift Pipeline runs three different Tekton tasks:
1- containerfile-create: This task creates the Containerfile and the model directory in the shared Persistent Volume.
apiVersion: tekton.dev/v1
kind: Task
metadata:
  name: modelcar-containerfile-create
spec:
  steps:
    - computeResources: {}
      image: 'registry.access.redhat.com/ubi8/ubi-minimal:latest'
      name: generate-containerfile
      script: |
        #!/usr/bin/env bash
        echo 'FROM registry.access.redhat.com/ubi9/ubi-micro:9.4' > $(workspaces.data.path)/Dockerfile
        echo 'COPY ./models /models' >> $(workspaces.data.path)/Dockerfile
        echo 'USER 1001' >> $(workspaces.data.path)/Dockerfile
    - computeResources: {}
      image: 'registry.access.redhat.com/ubi8/ubi-minimal:latest'
      name: create-models-dir
      script: |
        #!/usr/bin/env bash
        mkdir -p $(workspaces.data.path)/models
  workspaces:
    - description: The workspace to store the downloaded files
      name: data
2- get-model-file: Downloads the model along with the directory structure and additional files from the Object Storage
apiVersion: tekton.dev/v1
kind: Task
metadata:
  name: modelcar-download-model
  params:
    - name: objectApiUrl
      type: string
    - name: objectBucket
      type: string
    - name: objectAccessKey
      type: string
    - name: objectSecretKey
      type: string
    - name: directoryPath
      type: string
  steps:
    - computeResources: {}
      image: 'quay.io/luisarizmendi/s3cmd:latest'
      name: download-from-object
      script: |
        #!/usr/bin/env sh
        set -e

        # Create s3cmd config
        cat > /tmp/.s3cfg << EOF
        [default]
        access_key = $(params.objectAccessKey)
        secret_key = $(params.objectSecretKey)
        host_base = $(params.objectApiUrl)
        host_bucket = $(params.objectApiUrl)
        use_https = True
        signature_v2 = False
        # Disable SSL verification
        check_ssl_certificate = False
        check_ssl_hostname = False
        EOF

        # Create target directory for recursive copy
        rm -rf $(workspaces.data.path)/models
        mkdir -p $(workspaces.data.path)/models

        echo "Copying from Object Storage in $(params.objectBucket)/$(params.directoryPath)/ to $(workspaces.data.path)/models/"

        # Use s3cmd to copy the directory
        s3cmd -c /tmp/.s3cfg get --recursive s3://$(params.objectBucket)/$(params.directoryPath)/ $(workspaces.data.path)/models/

        # Check if the download was successful
        if [ 0 -ne 0 ]; then
          echo "Failed to download files from object storage"
          exit 1
        fi

        echo "----- $(workspaces.data.path) ------"
        ls $(workspaces.data.path)
        echo "-----------"
  workspaces:
    - description: The workspace to store the downloaded files
      name: data
In summary, this task generates a directory structure like the one shown here consists of a Containerfile at the root level and a models folder that will contain the model itself.
Depending on the inference server you plan to use (covered in the next module), your model must follow specific requirements—such as file format, directory structure, and optional configuration files. In our example we will use NVIDIA Triton server so we have our model in the onnx extension with the <model name>/<version>/model.onnx directory structure and included the config.pbtxt inference server configuration file shown below.
|
name: "hardhat"
platform: "onnxruntime_onnx"
max_batch_size: 0
input [
  {
    name: "images"
    data_type: TYPE_FP32
    dims: [-1, 3, 640, 640]
  }
]
output [
  {
    name: "output0"
    data_type: TYPE_FP32
    dims: [ -1, 6, -1 ]
  }
]
backend: "onnxruntime"
The content is generated automatically by the Pipeline but be aware that the output value configured in this file is critical, as the Inference Server will fail to start if it doesn’t match the model’s expected output dimensions. In this example, the value is set to [-1, 6, -1]. This corresponds to a model with two classes (hardhat and no-hardhat). The second number (6) reflects the number of predicted values per anchor, which includes class scores and bounding box parameters. When you add more classes (as you’ll do in the final module), you must increase this second value accordingly. For instance, if you add one additional class, the value should be updated to [-1, 7, -1].
|
3- build-and-push: Performs the multi-arch (x86_64 and arm64) container image build using Podman and push it into the Quay Container Image Registry.
apiVersion: tekton.dev/v1
kind: Task
metadata:
  name: podman-build-and-push
  namespace: user99-tools
spec:
  params:
    - description: Full image name including registry
      name: IMAGE
      type: string
    - default: ./Containerfile
      description: Path to Containerfile
      name: CONTAINERFILE
      type: string
    - default: ./
      description: Build context
      name: CONTEXT
      type: string
    - default: 'linux/amd64,linux/arm64'
      description: 'Comma-separated target platforms (e.g., linux/amd64,linux/arm64)'
      name: PLATFORMS
      type: string
  results:
    - description: URL of the pushed multiarch image
      name: IMAGE_URL
      type: string
  steps:
    - computeResources: {}
      image: 'quay.io/podman/stable:latest'
      name: build-and-push
      script: |
        #!/bin/bash
        set -e
        echo "Enabling binfmt_misc for cross-arch builds..."
        podman run --rm --privileged docker.io/multiarch/qemu-user-static --reset -p yes
        export IMAGE=$(params.IMAGE)
        IMAGE="${IMAGE#http://}"
        IMAGE="${IMAGE#https://}"
        IMAGE="${IMAGE//\/\//\/}"
        echo ""
        echo "Creating multiarch manifest: $IMAGE"
        for arch in $(echo $(params.PLATFORMS) | tr ',' ' '); do
          tag="${arch//\//-}"
          echo "Building for $arch -> $tag"
          podman build --platform ${arch##*/} -f $(params.CONTAINERFILE) -t $IMAGE-$tag $(params.CONTEXT)
          podman push $IMAGE-$tag
        done

        echo "Creating and pushing manifest list..."
        podman manifest create $IMAGE
        for arch in $(echo $(params.PLATFORMS)  | tr ',' ' '); do
          tag="${arch//\//-}"
          podman manifest add $IMAGE $IMAGE-$tag
        done
        podman manifest push --all $IMAGE docker://$IMAGE
      securityContext:
        privileged: true
        runAsUser: 0
      workingDir: $(workspaces.source.path)
  workspaces:
    - name: source
    - mountPath: /root/.docker
      name: dockerconfig
optional: true| Other build systems could be used, for example you could use the built-in OpenShift capabilities, but as today (May 2025) multi-arch build support is planned but still on roadmap, although you can still use OpenShift builds for this matter if you have both x86_64 and arm64 worker nodes without the multi-arch build support.. |
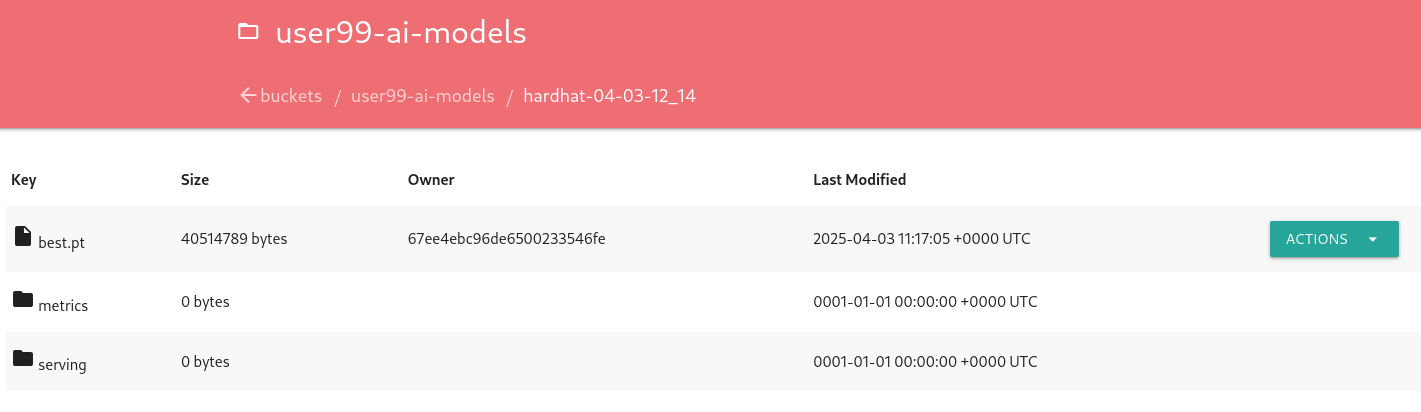
Pipeline execution review
After some time, the pipeline will finish. You can at that point go to the Object Storage and check that:
1- The contents that have been uplaoded to models directory in your "USERNAME-ai-models" bucket.
2- The "modelcar" container image is available in the internal Quay Container Image Registry (user: USERNAME ; password: PASSWORD)
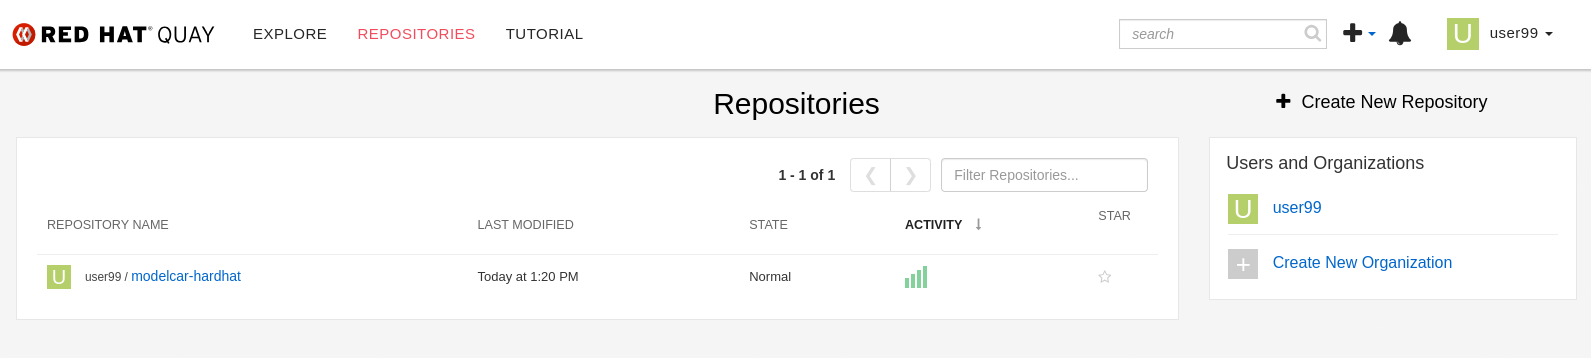
| The repository is created with "public" visibility, so you won’t need to include credentials when pulling it from the registry. This is designed to simplify the upcoming deployment steps in the workshop. However, in a production environment, it is strongly recommended to use proper credentials for security purposes. |
3- The newly trained model in the Model Registry (check the left menu in OpenShift AI console), where it will be available along with all the associated metadata details that were added during the registration process.
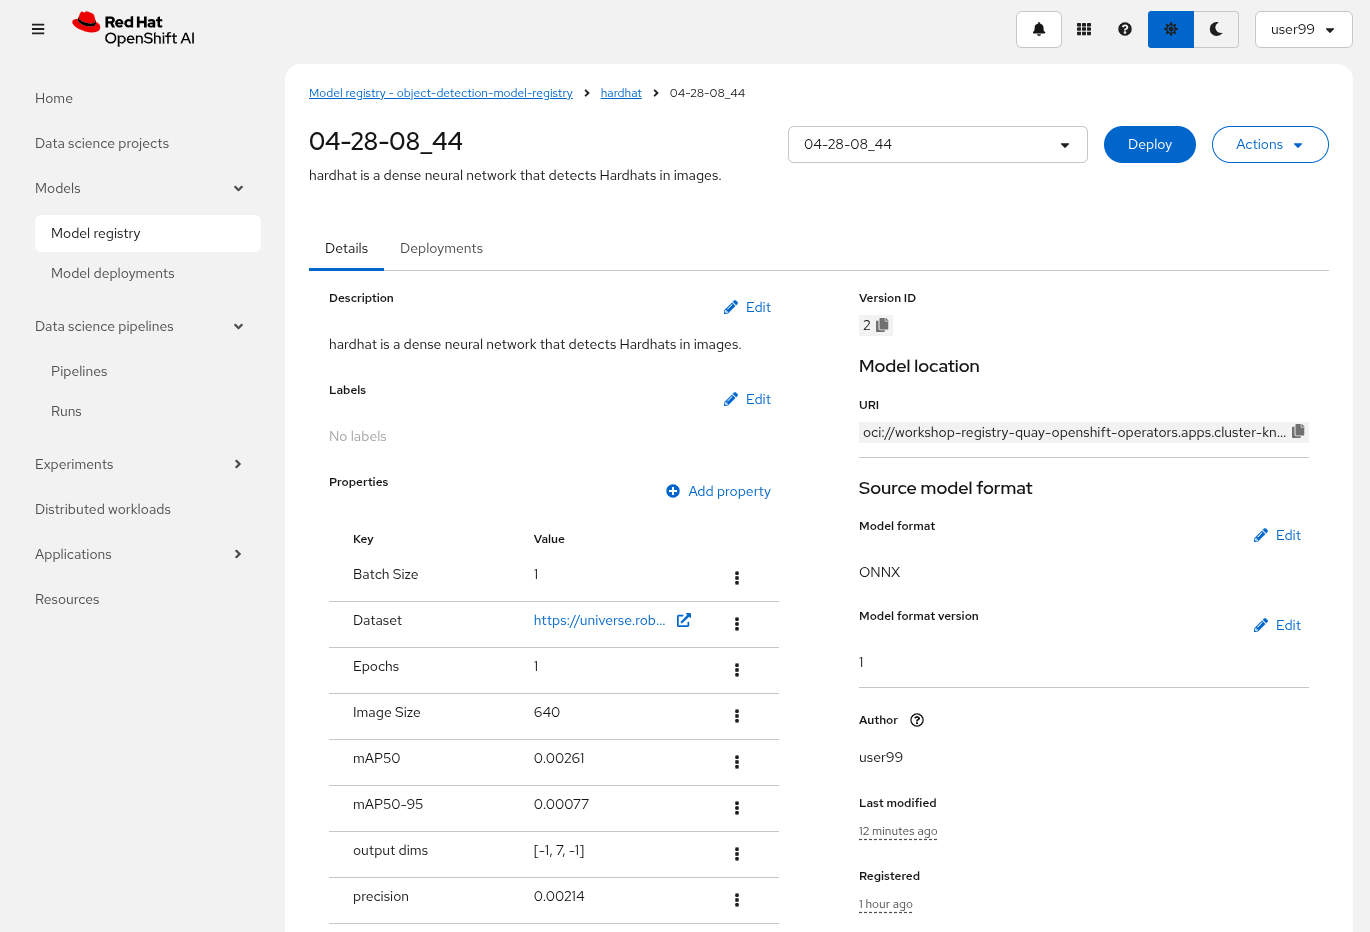
The Model Registry serves as the central hub for model publication. From here, you can directly deploy the model to the same OpenShift cluster running OpenShift AI, utilizing one of the supported Model Serving options. However, in this workshop, we won’t be using this method. Instead, model inference will be performed at the Edge using Red Hat Enterprise Linux. More details on this approach will be provided in the Model Serving section.
One final note about Pipelines. In this example, you executed the pipeline manually. However, in a production environment, you will likely want to automate its execution, either by scheduling it to run at regular intervals or triggering it in response to external events (though that is a topic for another discussion). This can be achieved using the Schedule feature (click on the three dots on the righ in the Pipeline server), which allows you to automate the execution of your pipeline at defined intervals, ensuring that model training and updates are performed regularly without manual intervention.

Solution and Next Steps
In this section, a new Kubeflow Pipeline was created based on the hardhat-kubeflow-pipeline.py script. This pipeline successfully trained the YOLO model for hardhat detection, generated the model file, and uploaded it into the OpenShift Data Foundation Object Storage. This model file will be essential for the next section, Model Serving.
However, probably you used the reduced ("Mock Training") dataset and a limited number of epochs for faster training, so the model produced won’t perform adequately in the field. It is advisable to discard that model. Instead, you can upload and use the provided pre-trained model going forward to ensure better accuracy and robustness in deployment.
If the model you use isn’t capable of delivering strong performance, you won’t achieve reliable or accurate results during the inference phase, so if you used the ("Mock Training") dataset you must update your modelcar image with the provided pre-trained model.
|
The easiest way to use the provided pre-trained model in your environment is to pull the v1 of this pre-created modelcar container image and push it into the Quay Container Image Registry.
podman pull https://quay.io/repository/luisarizmendi/modelcar-hardhat:v1

podman login -u {user} https://workshop-registry-quay-openshift-operators.apps.{ocp_cluster_url}/{user}

podman push https://workshop-registry-quay-openshift-operators.apps.{ocp_cluster_url}/{user}/<IMAGE NAME>:<IMAGE TAG>
You can also download the version 1 (v1) of the model and upload it into the the right location (serving directory) on the Object Storage using the Object Storage browser, replacing the one that was created by the Kubeflow Pipeline, and then create the modelcar container image into the Quay Container Image Registryby re-runing the OpenShift Pipeline after changing the file with the mode. Go to the Pipelines menu in the OpenShift Console, select the pipeline and move into the "PipelinesRun" tab, there you can click the three dots on the right and select "Rerun".
|
Before jump into the next section, be sure that you stopped your Code Workbench to save some resources in the OpenShift cluster.
Now you are ready to continue!